


黑马程序员Java项目实战《苍穹外卖》——前端篇
Vue基础回顾
基于脚手架创建前端工程
环境要求
-
node.js:前端项目的运行环境 -
npm:JavaScript的包管理工具- 查看node和npm的版本号

-
Vue CLI:基于Vue进行快速开发的完整系统,实现交互式的项目脚手架- 安装Vue CLI
npm i @vue/cli -g
创建工程
使用 Vue CLI 创建前端工程:
- 方式一:vue create 项目名称
创建全过程:
- 方式二:vue ui

项目结构
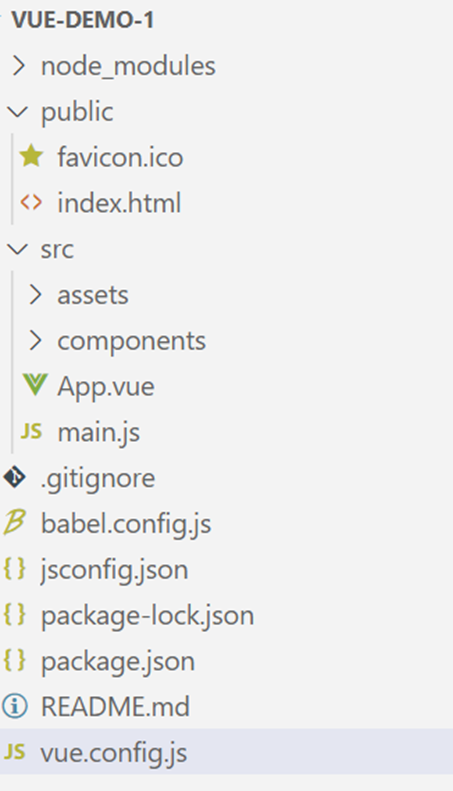
重点的目录/文件:
- node_modules:当前项目依赖的js包
- assets:静态资源存放目录
- components:公共组件存放目录
- App.vue:项目的主组件,页面的入口文件
- main.js:整个项目的入口文件
- package.json:项目的配置信息、依赖包管理
- vue.config.js:vue-cli配置文件
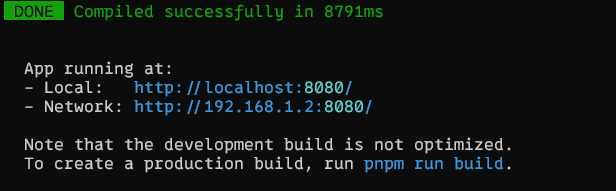
项目的启动
npm run serve # pnpm run serve
提示如下即成功:
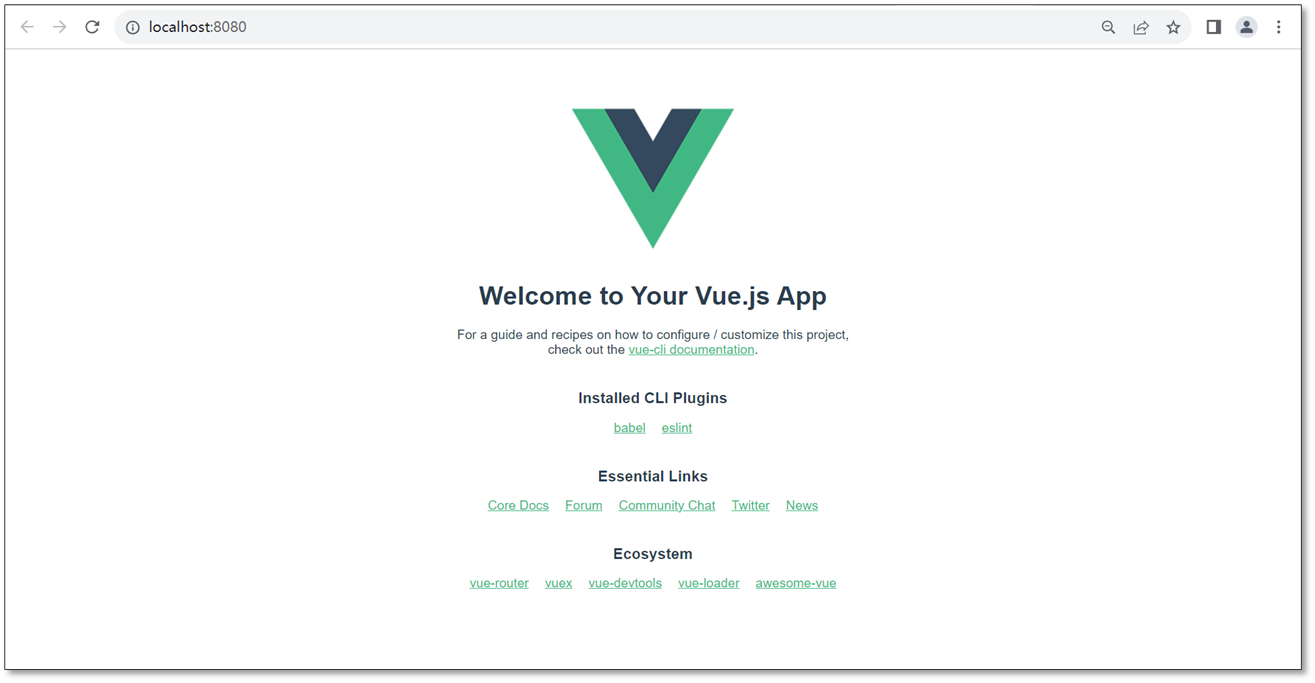
访问浏览器 localhost:8080:
配置前端端口号
默认的8080和后端tomcat默认端口冲突,所以一般需要进行更改:
在vue.config.js中
const { defineConfig } = require('@vue/cli-service')
module.exports = defineConfig({
  transpileDependencies: true,
  devServer: {
    port: 7070
  }
})
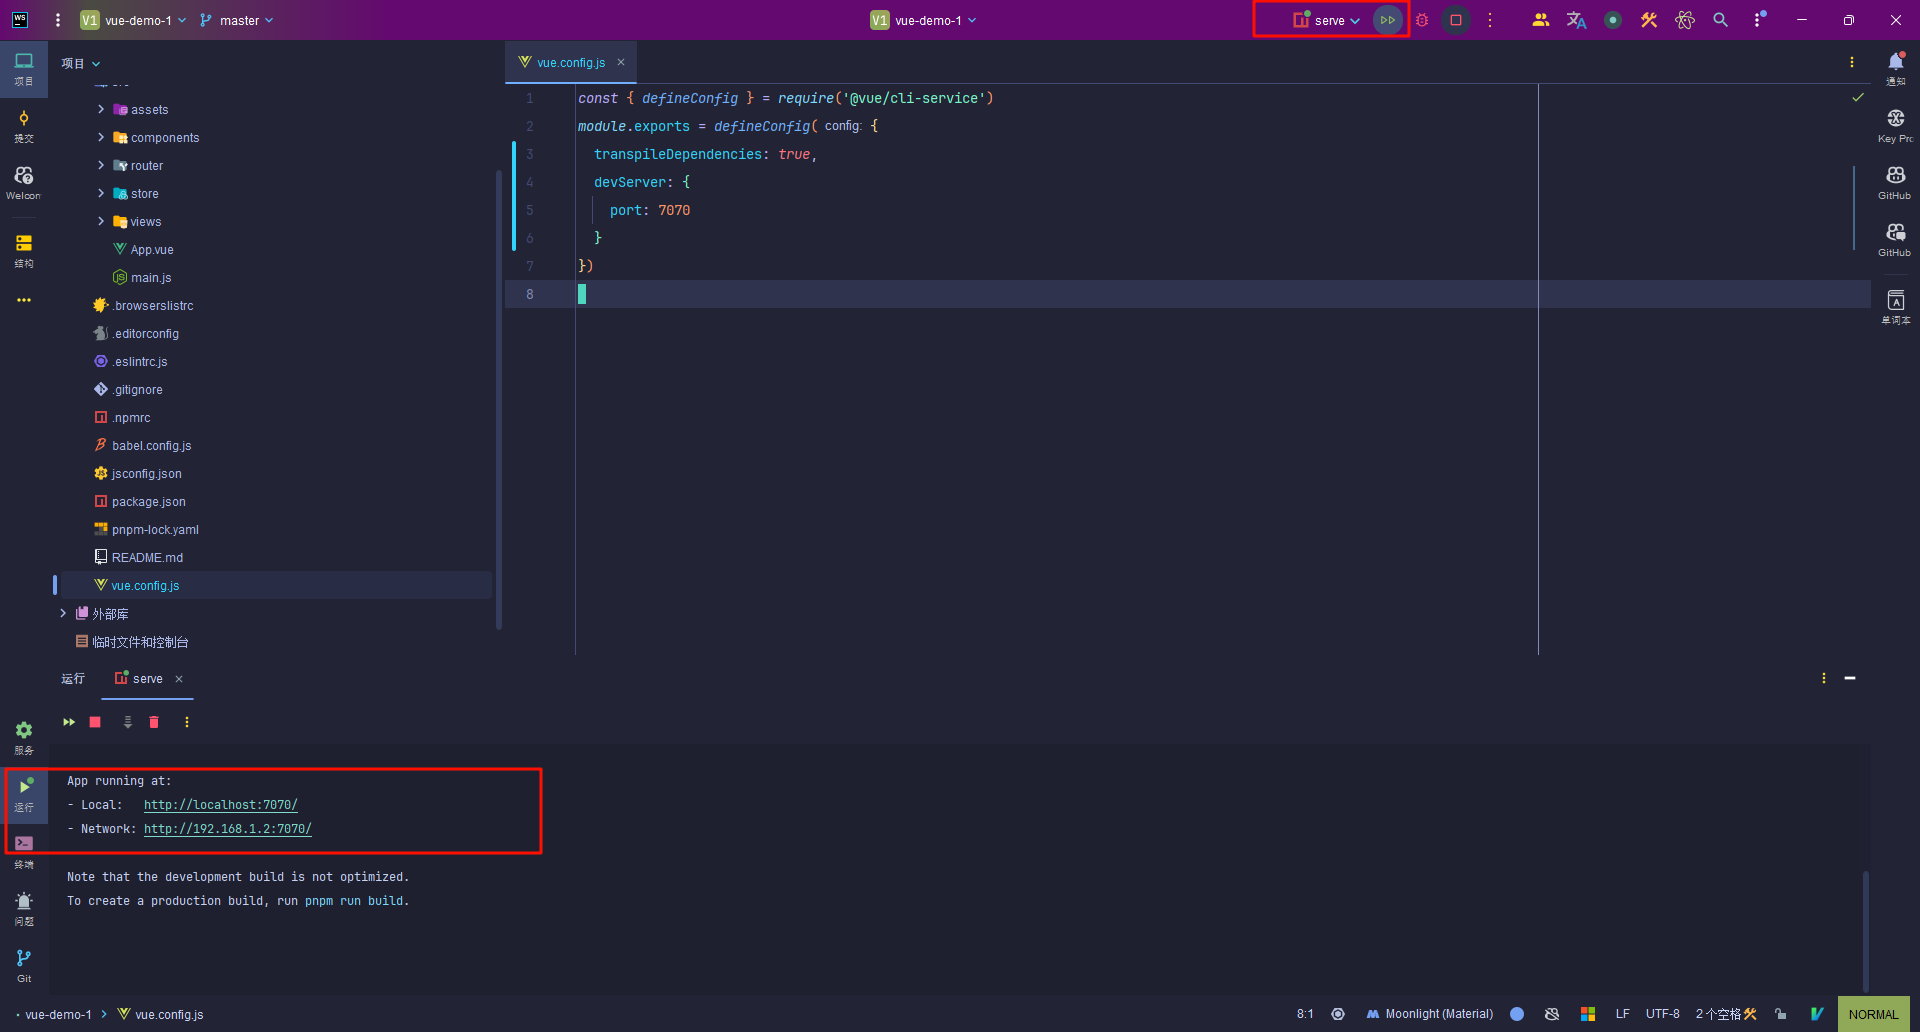
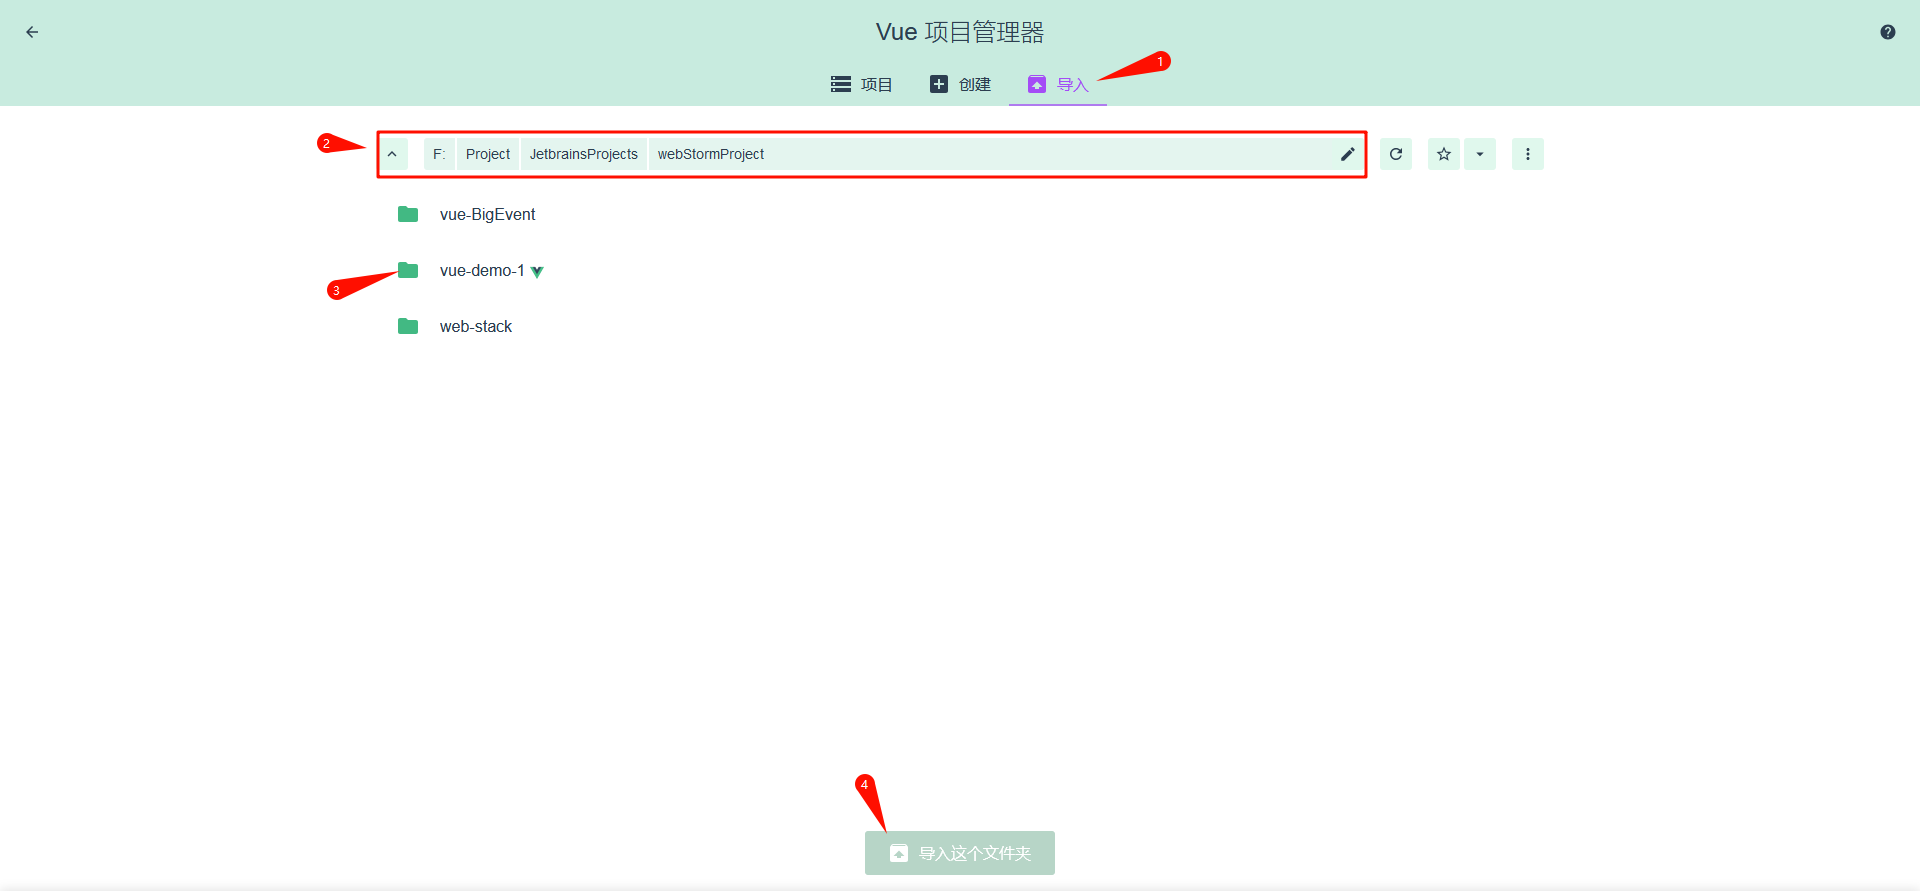
webstorm适配启动Vue项目
根据刚刚创建的项目,在webstorm中设置:
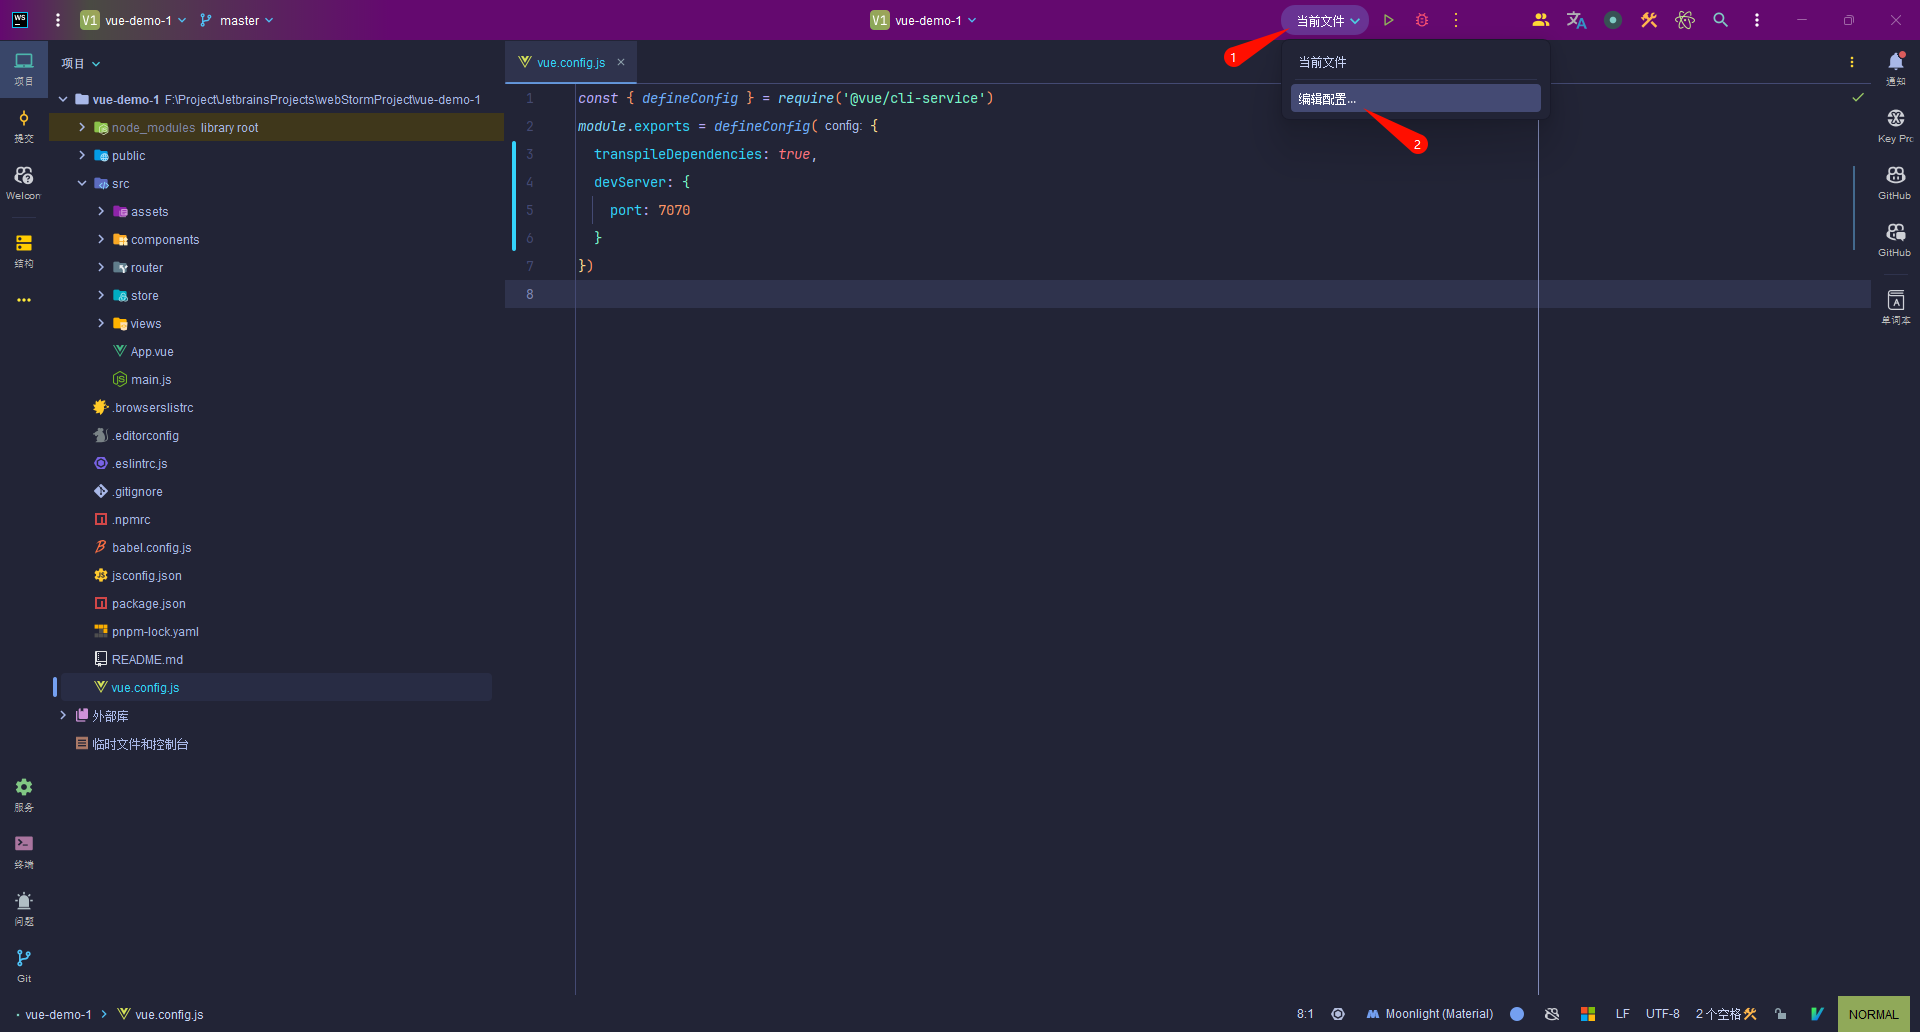
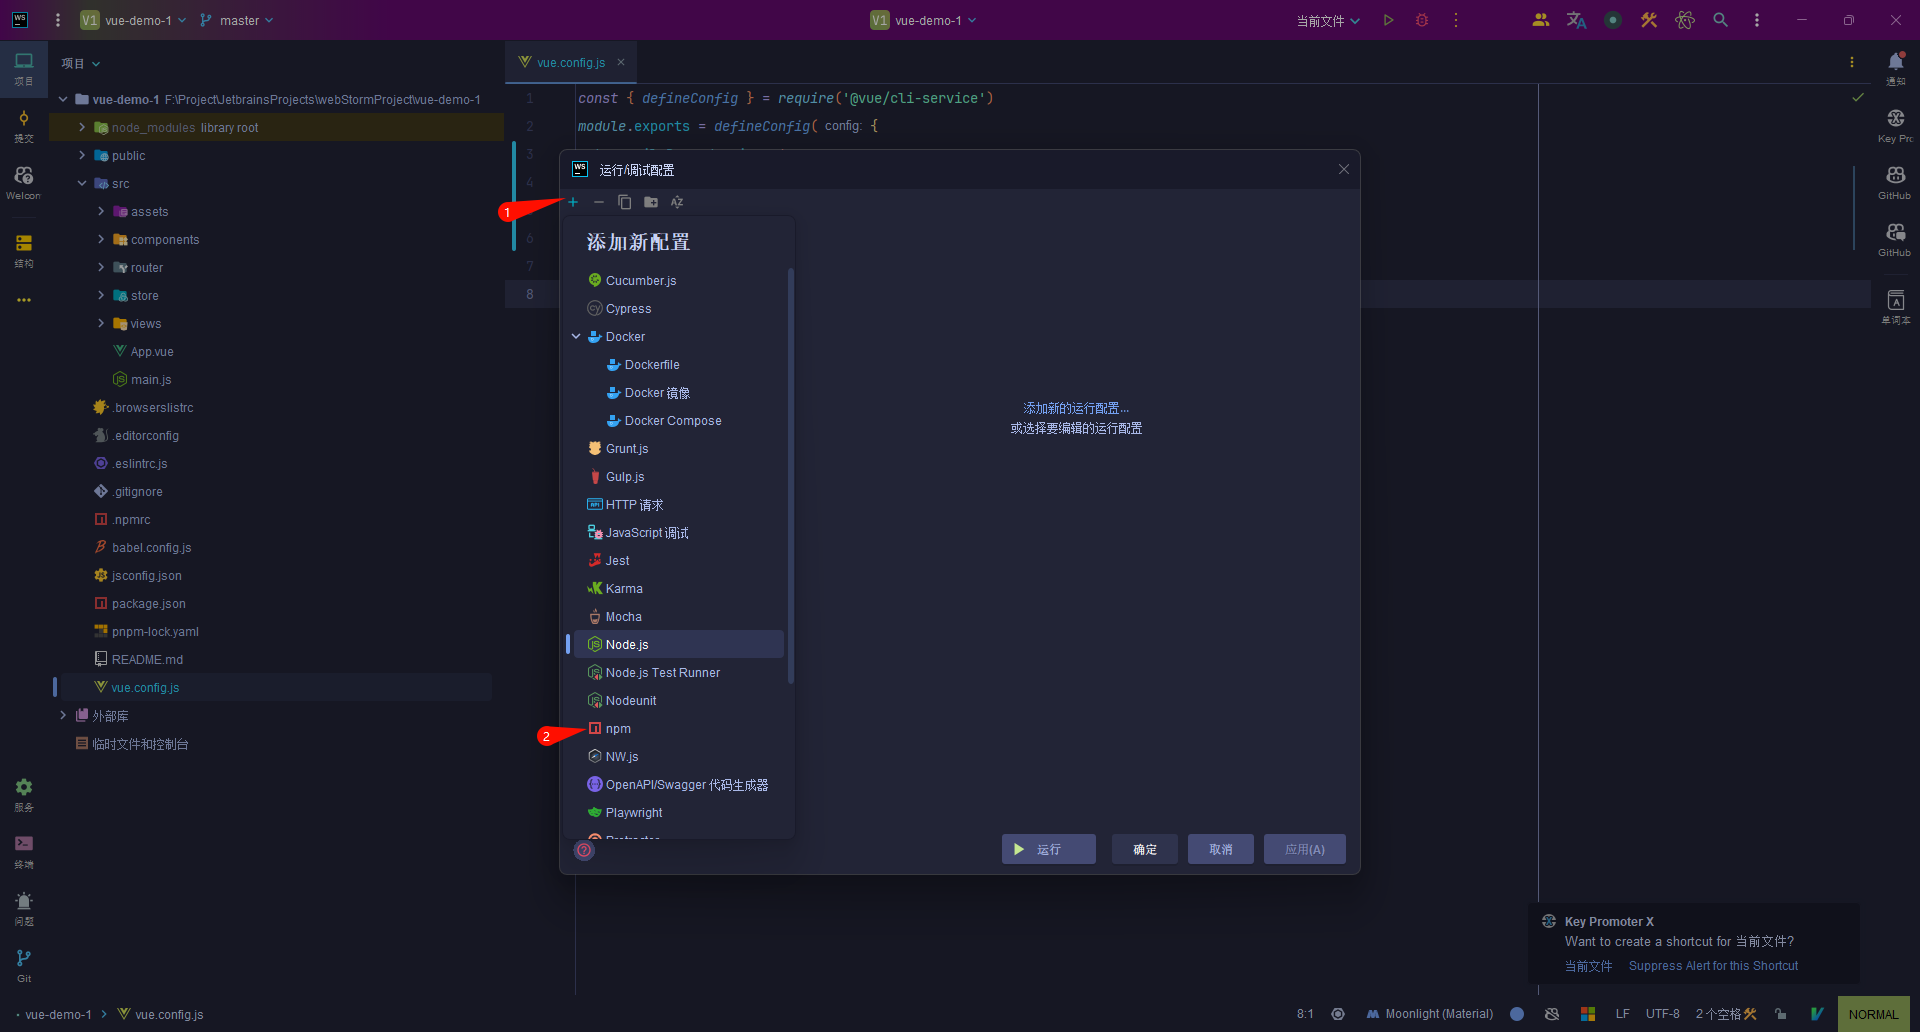

点击运行后:
Vue2的基本使用
Vue组件组成
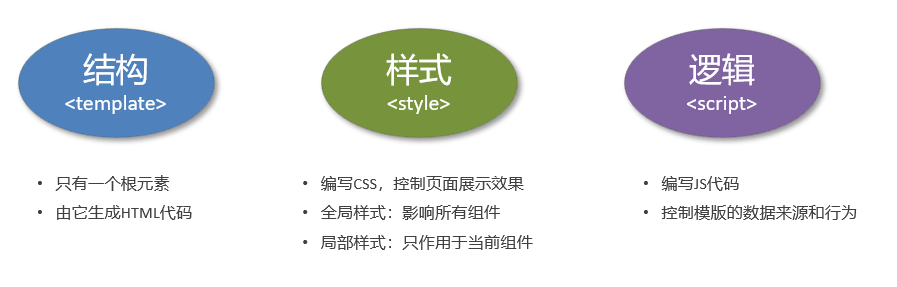
Vue 的组件文件以 .vue 结尾,每个组件由三部分组成:
<script></script>
export default 作为vue核心的一部分,它的组成如下:
<script>
	export default {
	};
</script>
可以简单理解为,vue导出的逻辑,当前 template 中使用的逻辑和操作都需要进行导出
data()
返回数据,可以让 template 中的元素访问:
export default {
  data () {
    return { name: '张三', age: 30 }
  }
}
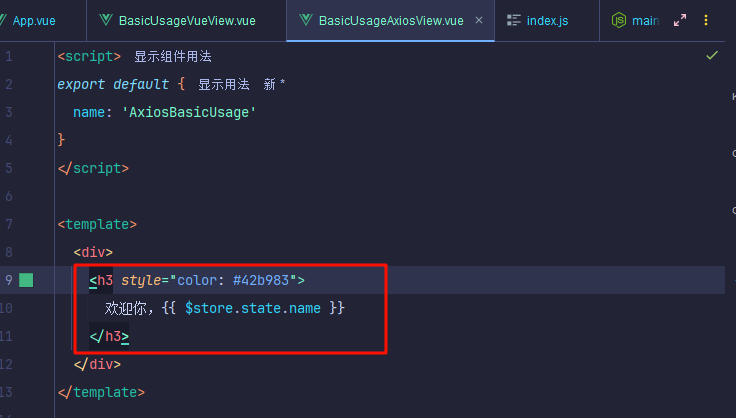
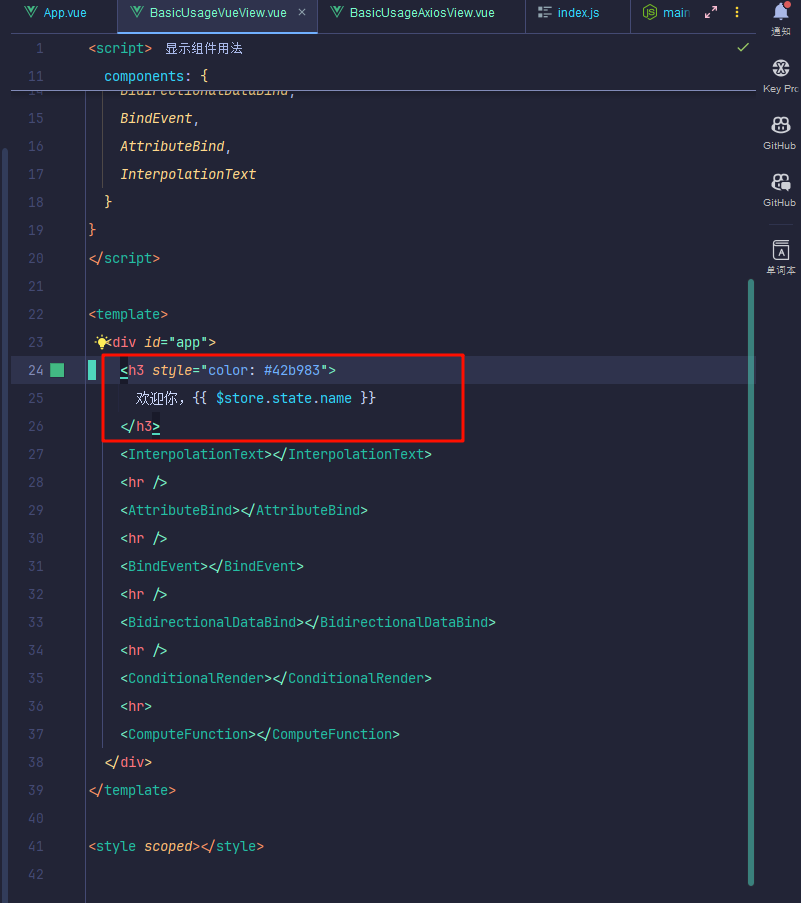
使用示例:文本插值
如果是 script 内部调用 data() 的属性,需要使用 this.属性 进行调用,如:事件绑定中的案例
methods
定义vue页面的方法,定义的方法可以配合事件绑定使用
export default {
  methods: {
    methodName () {
     // 逻辑操作
    }
  }
}
在 script 内部调用:
this.xxx(arg) // arg没有可以不填
- 可以参考:双向绑定
computed
定义vue页面的计算方式,不能和事件绑定配合,一般用于计算结果并返回
export default {
  computed: {
    attrName () {
     // 逻辑操作
    }
  }
}
<script>
export default {
  name: 'ComputeFunction',
  data () {
    return {
      firstName: '',
      lastName: ''
    }
  },
  methods: {
    getFullName (firstName, lastName) {
      this.firstName = firstName
      this.lastName = lastName
      return this.firstName + ' ' + this.lastName // 同样,methods也可以返回计算结果,这样往往速度低于computed,因为methods没有缓存
    }
  },
  computed: {
    fullName () {
      return this.firstName + ' ' + this.lastName
    }
  }
}
</script>

<template>
  <div>
    <span>firstName: </span>
    <input v-model="firstName" type="text">
    <br style="margin-bottom: 30px">
    <span>lastName: </span>
    <input v-model="lastName" type="text">
    <div><h3>computed result: </h3>{{fullName}}</div>
    <div><h3>methods result: </h3>{{getFullName(firstName, lastName)}}</div>
    <button @click="getFullName('John', 'Smith')">methods事件处理</button>
  </div>
</template>

<style scoped>

</style>
总结
computed属性:适用于依赖其他数据的计算,具有缓存功能,更高效,适合在模板中声明式使用。methods:适用于事件处理和不需要缓存的计算,更灵活,可以在任何地方调用。
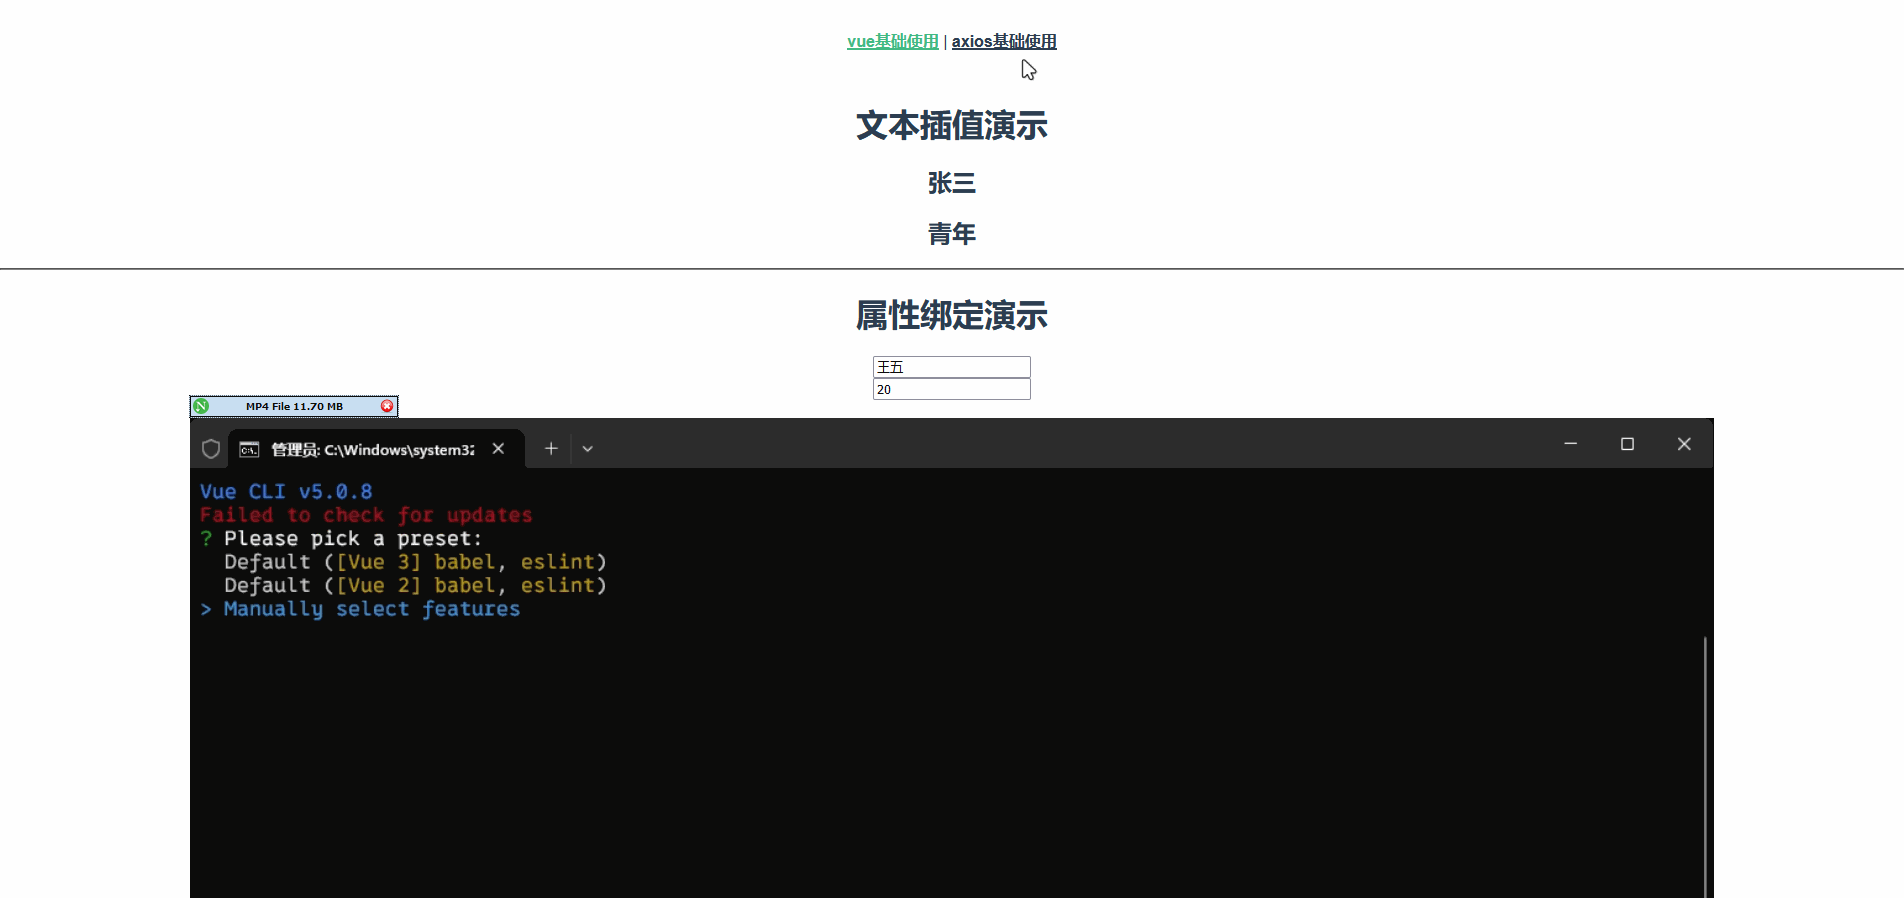
文本插值
- 作用:用来绑定 data 方法返回的对象属性
- 用法:
{{}}
<template>
    <div>
        <h1>{{ name }}</h1>
        <h1>{{ age > 60 ? '老年' : '青年' }}</h1>
    </div>
</template>
<script>
    export default {
        data() {
            return { name: '张三', age: 30 };
        }
    };
</script>

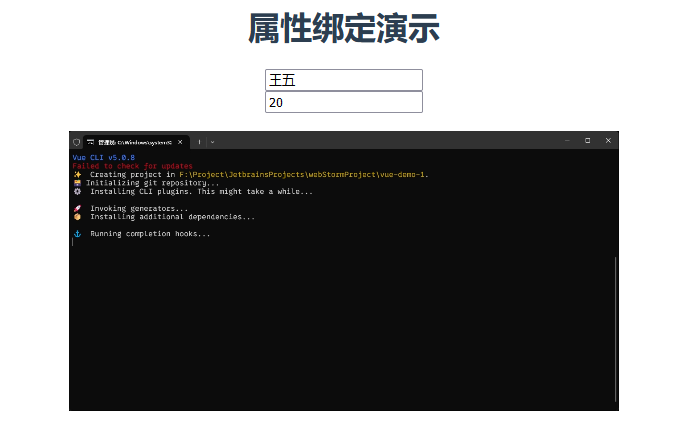
属性绑定
- 作用:为标签的属性绑定 data 方法中返回的属性
- 用法:
v-bind:xxx,简写为:xxx- html的原生标签属性基本都支持使用
:属性来获取 data 返回的值
- html的原生标签属性基本都支持使用
<script>
export default {
  name: 'AttributeBind',
  data () {
    return {
      name: '王五',
      age: 20,
      src: 'https://picgo.cn-sy1.rains3.com/2024/08/afcdd49825c6ec080e4ab40d92536ad0.mp4'
    }
  }
}
</script>

<template>
  <div>
    <h1>属性绑定演示</h1>
    <div><input type="text" v-bind:value="name"></div>
    <div><input :value="age" type="text"></div>
    <br>
    <div>
      <video :src="src" controls width="80%" autoplay></video>
    </div>
  </div>
</template>

<style scoped>

</style>
事件绑定
- 作用:为元素绑定对应的事件
- 用法:
v-on:xxx,简写为@xxx
<script>
export default {
  name: 'BindEvent',
  data () {
    return {
      name: '张三'
    }
  },
  methods: {
    handleSave () {
      alert(this.name)
    }
  }
}
</script>

<template>
  <div>
    <button v-on:click="handleSave">保存</button>
    <br>
    <button @click="handleSave">保存</button>
  </div>
</template>

<style scoped>

</style>
双向绑定
- 作用:表单输入项和 data 方法中的属性进行绑定,任意一方改变都会同步给另一方
- 用法:
v-model
<script>
export default {
  name: 'BidirectionalDataBind',
  data () {
    return {
      name: '李四'
    }
  },
  methods: {
    handleChange () {
      this.name = '王五'
    }
  }
}
</script>

<template>
  <div>
    <p>
      双向绑定:{{ name }}
    </p>
    <div>
      <input v-model="name" type="text"/>
    </div>
    <br>
    <div>
      <input type="button" value="改变" @click="handleChange">
    </div>
  </div>
</template>

<style scoped>

</style>
效果如下:

条件渲染
- 作用:根据表达式的值来动态渲染页面元素
- 用法:
v-if、v-else、v-else-if
<script>
export default {
  data () {
    return {
      sex: '1'
    }
  }
}
</script>

<template>
  <div>
    <h1>条件渲染</h1>
    <input type="text" v-model="sex">
    <div v-if="sex === '1'">
      男
    </div>
    <div v-else-if="sex === '2'">
      女
    </div>
    <div v-else>
      未知
    </div>
  </div>
</template>

<style scoped></style>
效果如下:

axios网络请求
Axios 是一个基于 promise 的 网络请求库,作用于浏览器和 node.js 中
安装命令:
npm install axios # pnpm i axios 或 yarn add axios
导入命令:
import axios from 'axios'
axios的API列表
关于数据请求可以查看:HTTP协议相关方法
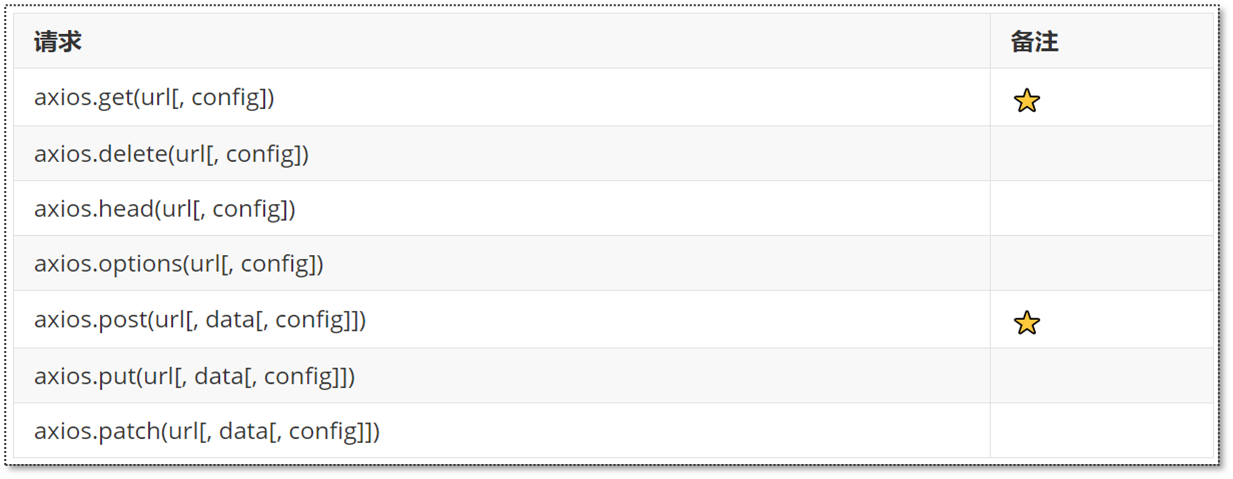
参数说明:
- url:请求路径
- data:请求体数据,最常见的是JSON格式数据
- config:配置对象,可以设置查询参数、请求头信息
跨域问题的解决
为了解决跨域问题,可以在 vue.config.js 文件中配置代理:
const { defineConfig } = require('@vue/cli-service')
module.exports = defineConfig({
  transpileDependencies: true,
  devServer: {
    port: 7070,
    proxy: {
      '/api': {
        target: 'http://localhost:8080',
        pathRewrite: {
          '^/api': ''
        }
      }
    }
  }
})
vue3中的配置或使用openresty也可以解决:SpringWeb报错——CORS问题解决
基本使用
axios 的post、get 方法示例:
axios.post('/api/employee/login',{
      username:'admin',
      password: '123456'
    }).then(res => {
      console.log(res.data)
    }).catch(error => {
      console.log(error.response)
    })
axios.get('/api/admin/shop/status',{
        headers: {
          token: ‘xxx.yyy.zzz’
        }
      })
axios 统一使用方式:axios(config)
axios({
      url: '/api/admin/employee/login',
      method:'post',
      data: {
        username:'admin',
        password: '123456'
      }
    }).then((res) => {
      console.log(res.data.data.token)
      axios({
        url: '/api/admin/shop/status',
        method: 'get',
        params: {id: 100},
        headers: {
          token: res.data.data.token
        }
      })
    }).catch((error) => {
      console.log(error)
    })
Vue-Router
什么是Vue-Router
vue 属于单页面应用,所谓的路由,就是根据浏览器路径不同,用不同的视图组件替换这个页面内容
Vue-Router的安装
- 在创建工程的过程中勾选
- 使用
vue ui命令-
导入工程
-
添加插件
-
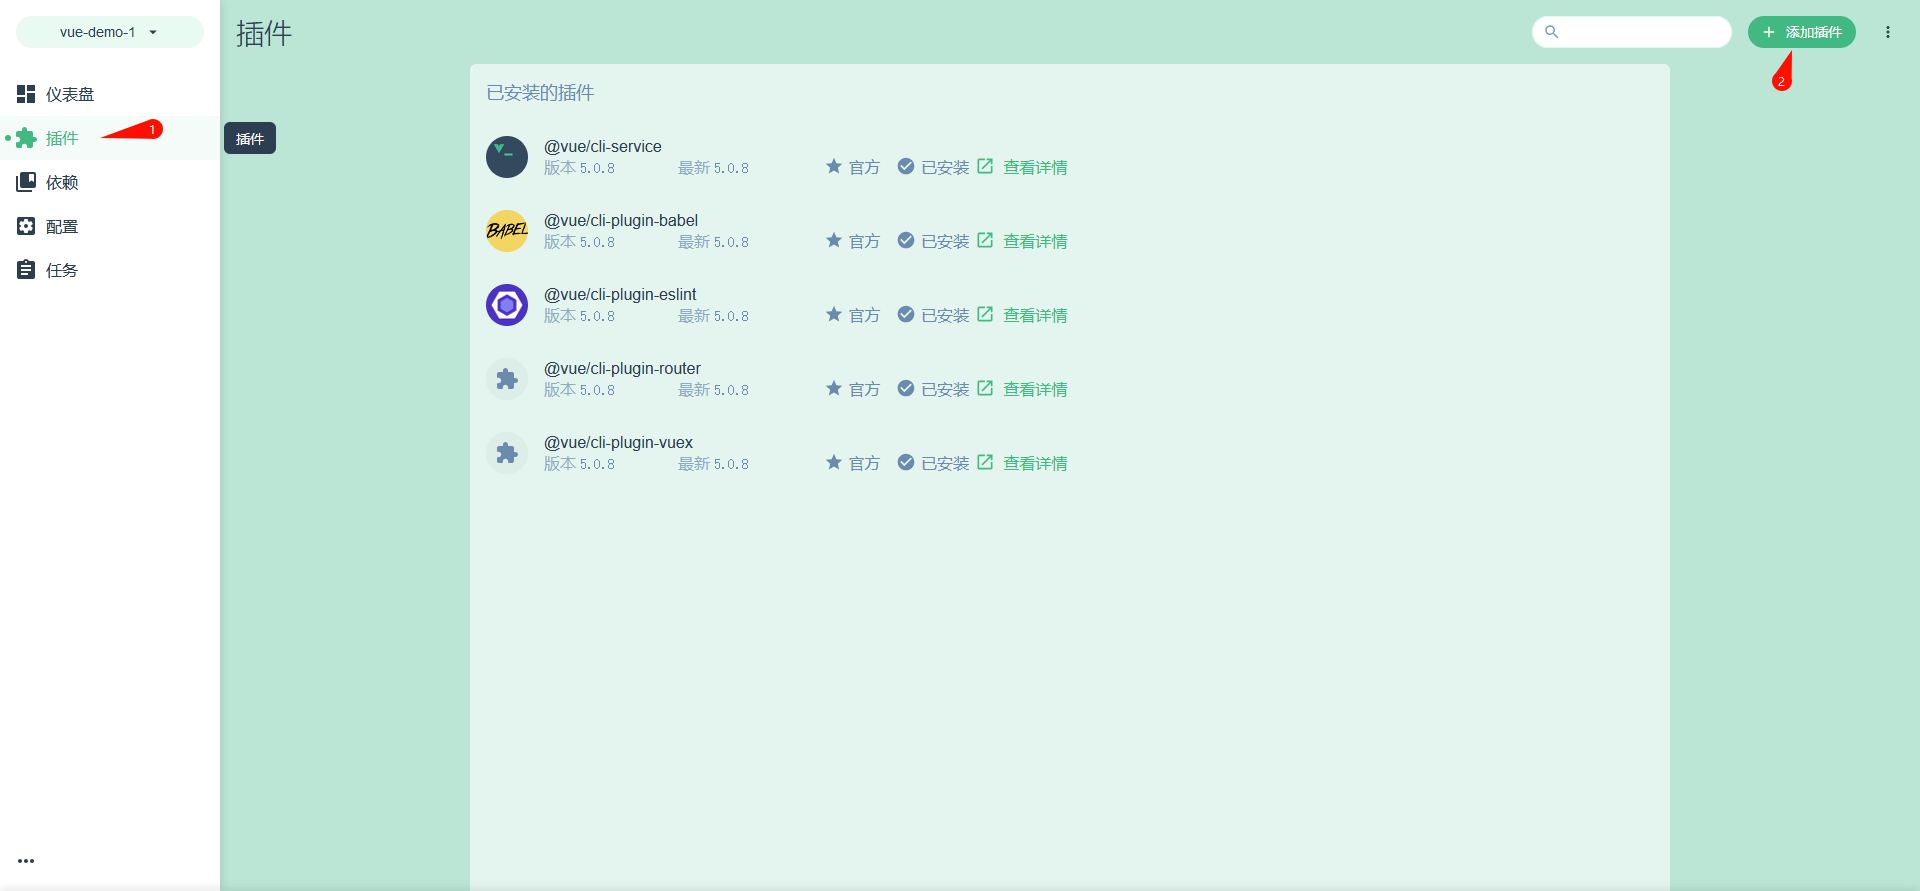
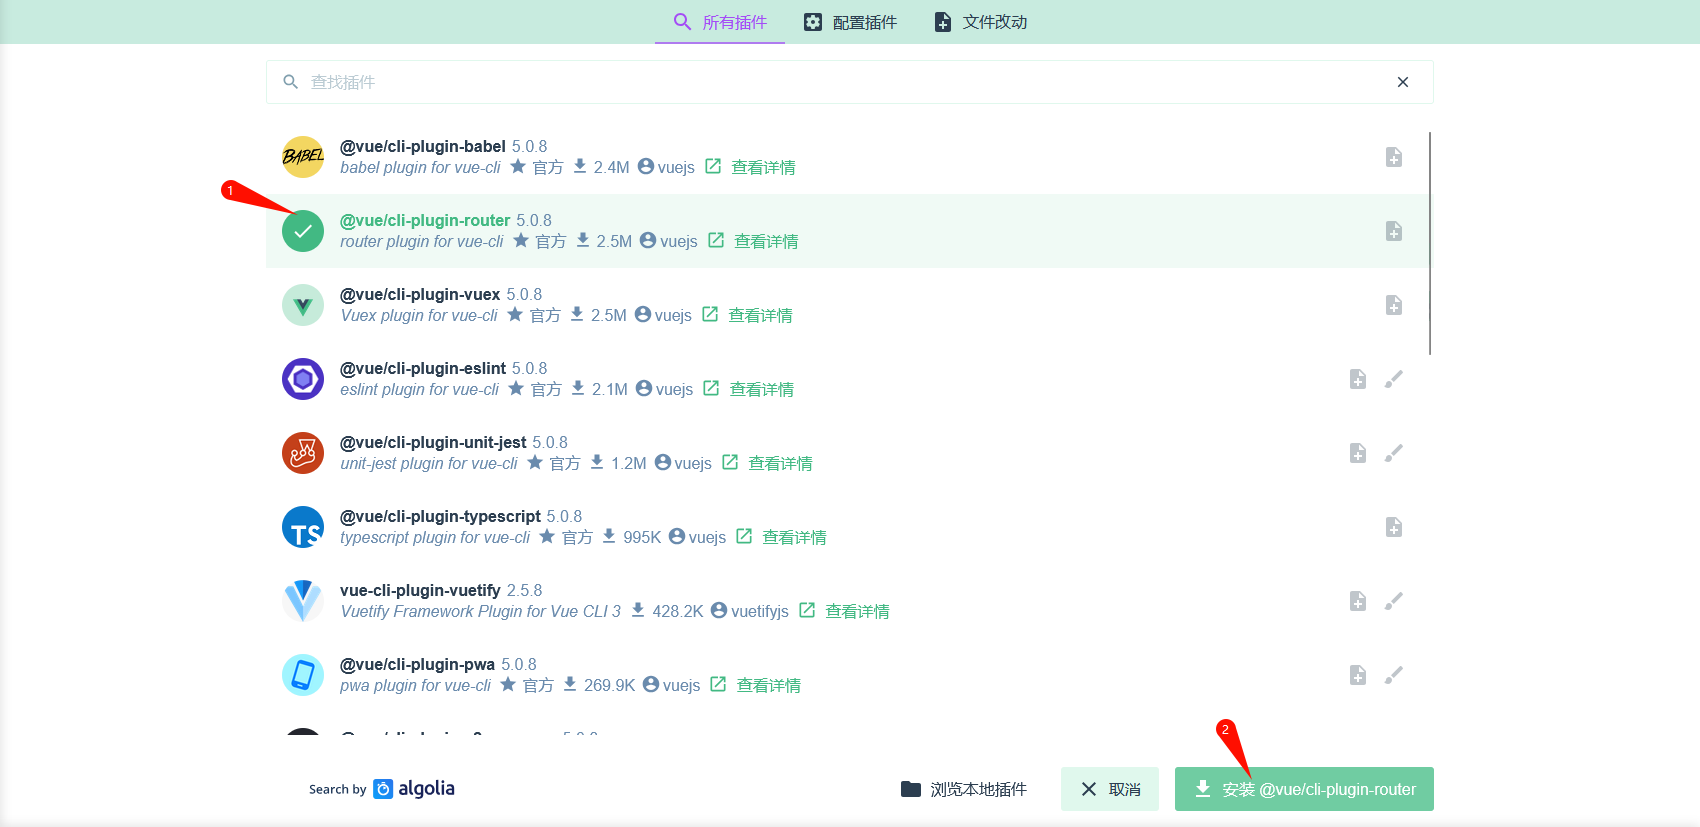
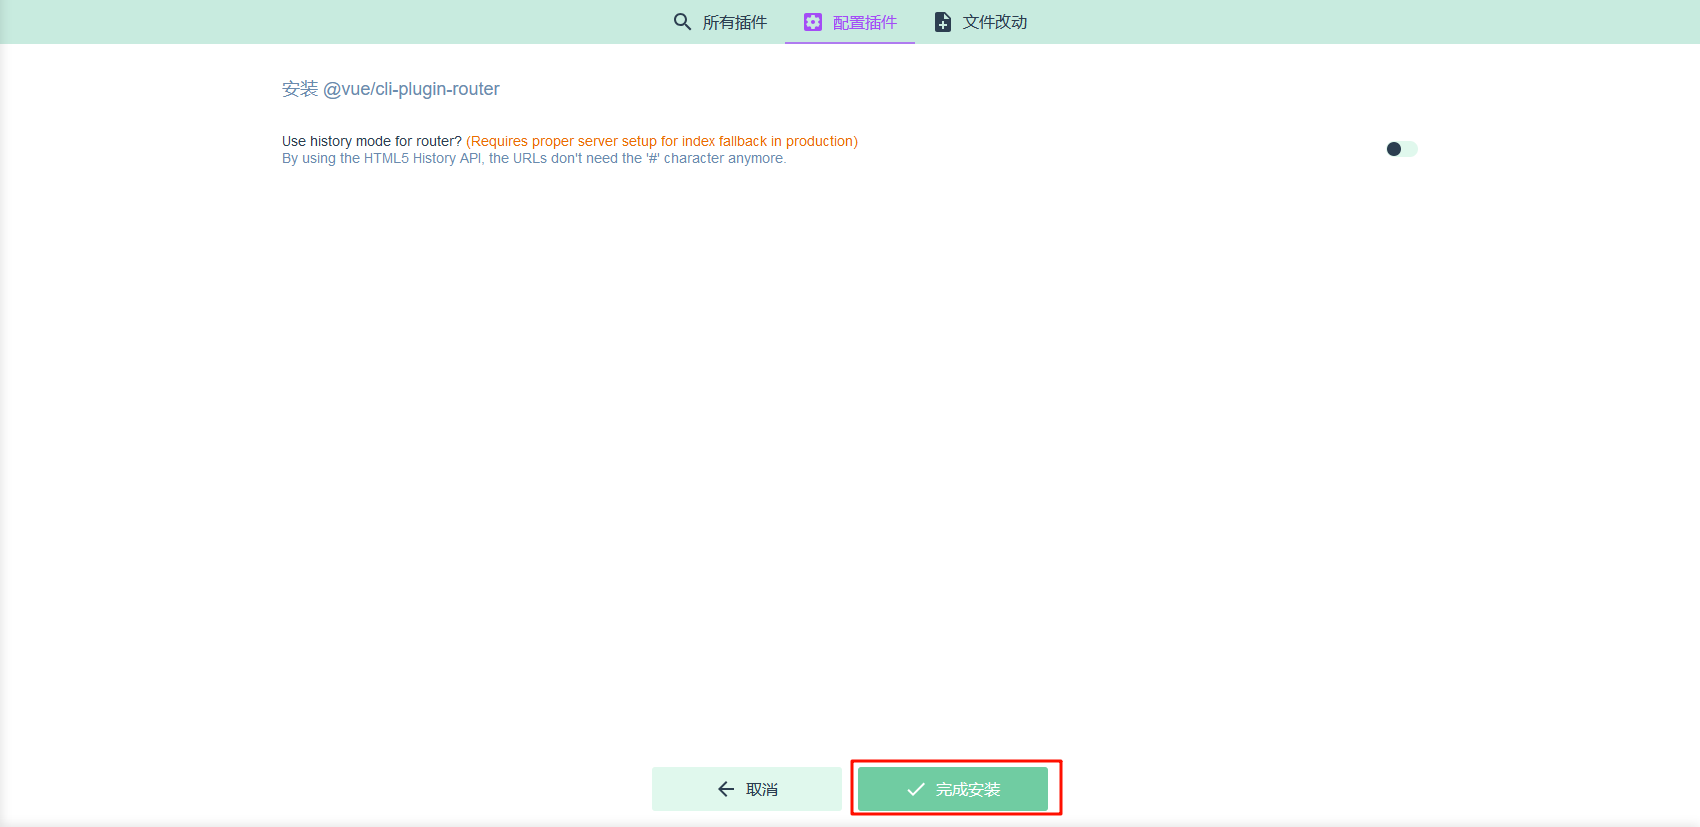
当然也可以手动使用 npm 安装:
npm install vue-router
Vue-Router路由
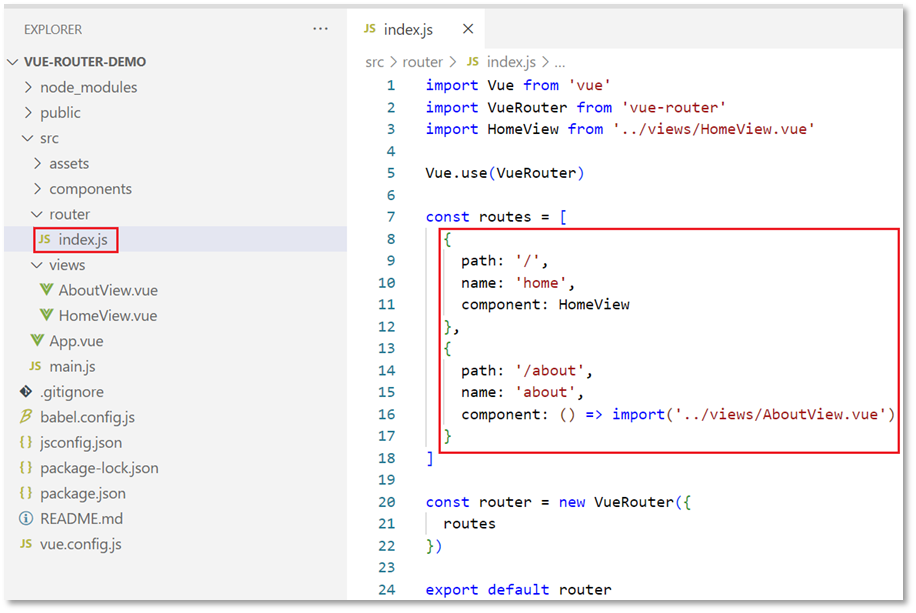
路由配置
路由组成:
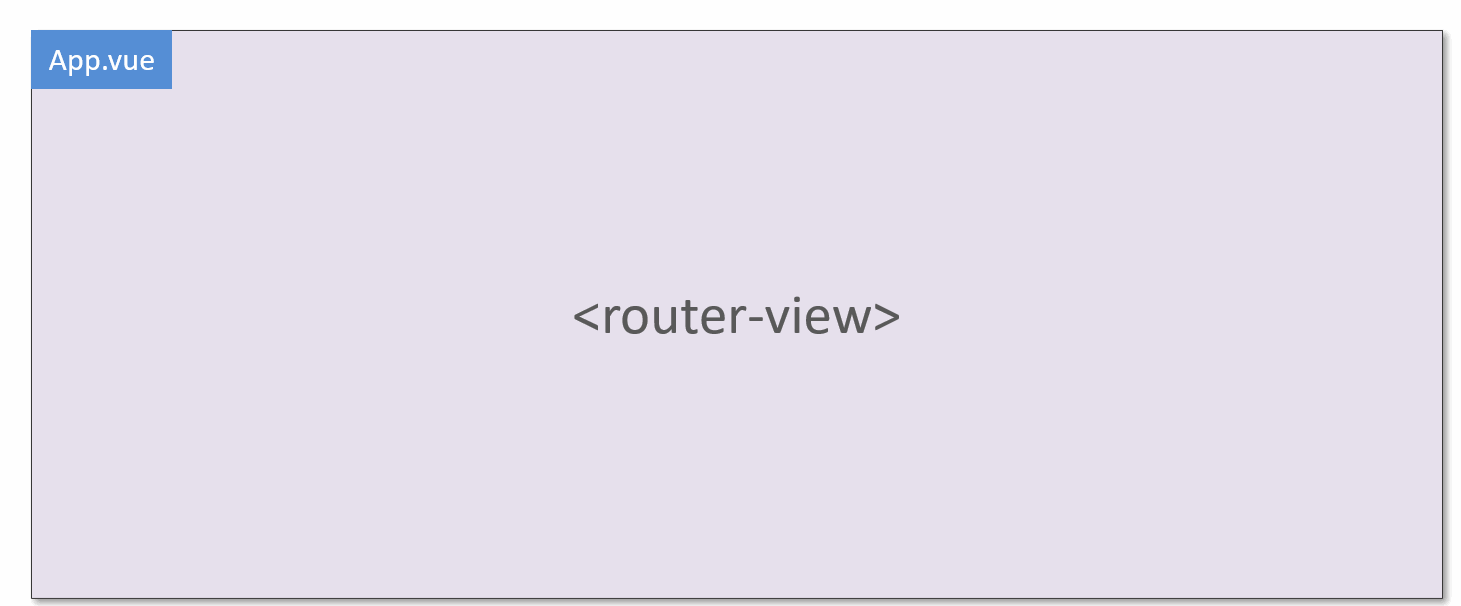
VueRouter:路由器,根据路由请求在路由视图中动态渲染对应的视图组件<router-link>:路由链接组件,浏览器会解析成<a>,用于路由跳转<router-view>:路由视图组件,用来展示与路由路径匹配的视图组件
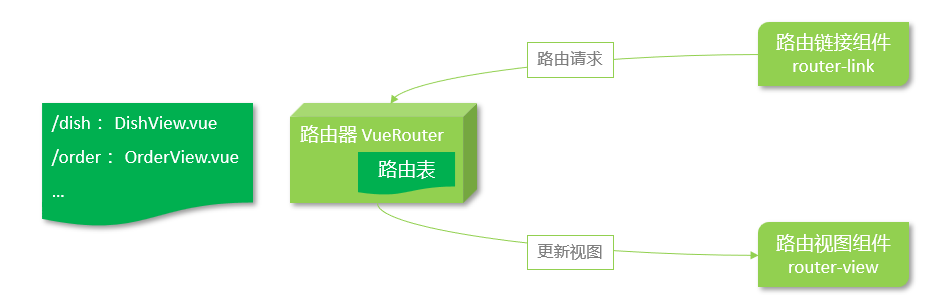
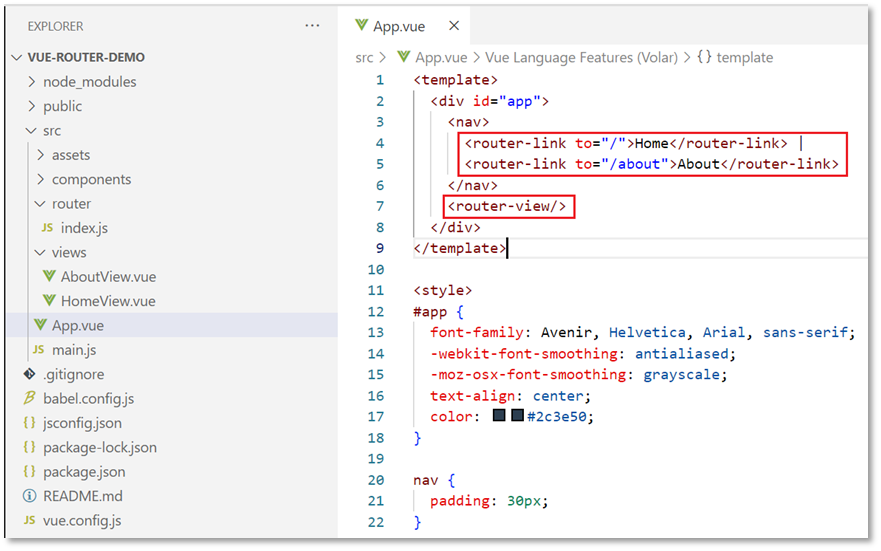
路由路径和视图对应关系:
路由跳转
字面意思,就是将当前页面进行切换,可以理解为一个 a 标签,但只是组件进行切换,而不是浏览器的切换
- 组件间的切换:
- 浏览器的切换:
可以看出:组件间的切换是非常迅速的,这是也是路由跳转的优点:无需重载当前浏览器页面
路由跳转的分类
路由跳转除了以上的 <router-link> 标签,还可以使用$router的方法进行跳转,这两种方法被称为:
- 标签式
- 编程式
<template>
  <div id="app">
    <nav>
      <router-link to="/useVue">vue基础使用</router-link> |
      <router-link to="/useAxios">axios基础使用</router-link> |
      <input type="button" value="编程式导航" @click="$router.push('/useVue')" />
    </nav>
    <router-view/>
  </div>
</template>
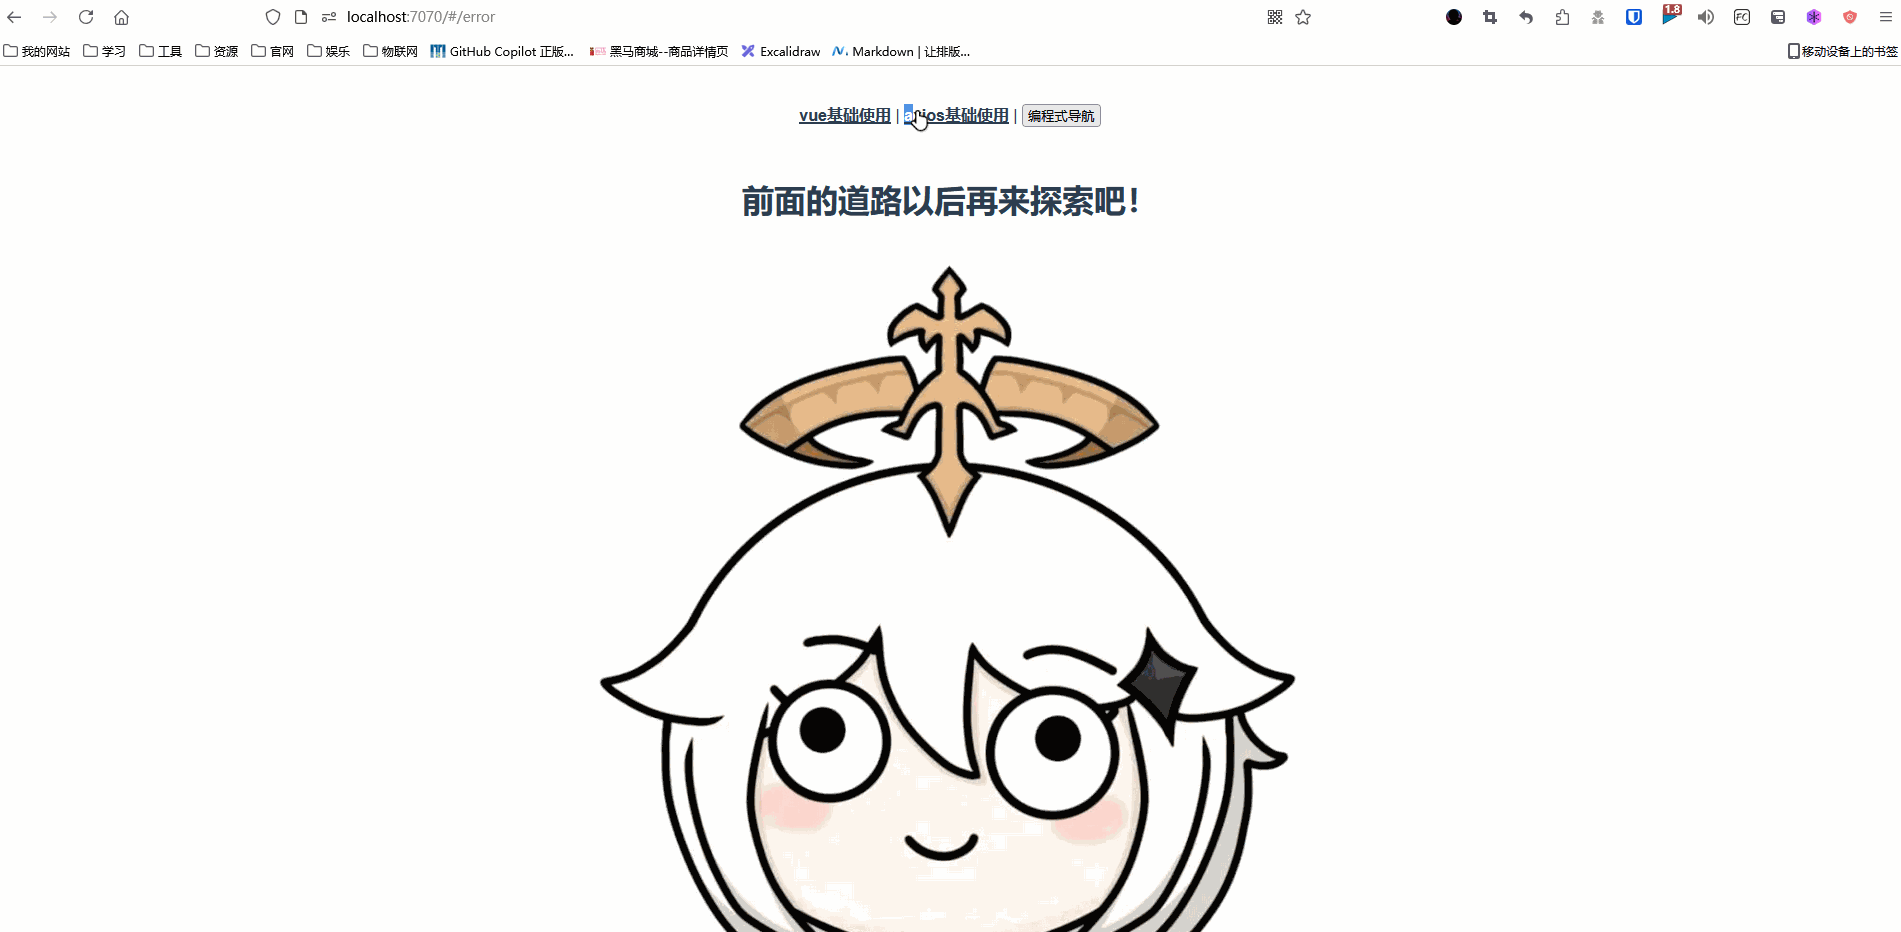
路由不存在处理
在 index.js 中的最下方配置如下:
{
  path: '/error',
  name: 'error',
  component: () => import('@/views/ErrorView.vue')
},
{
  path: '/*',
  redirect: '/error'
}
效果如下:
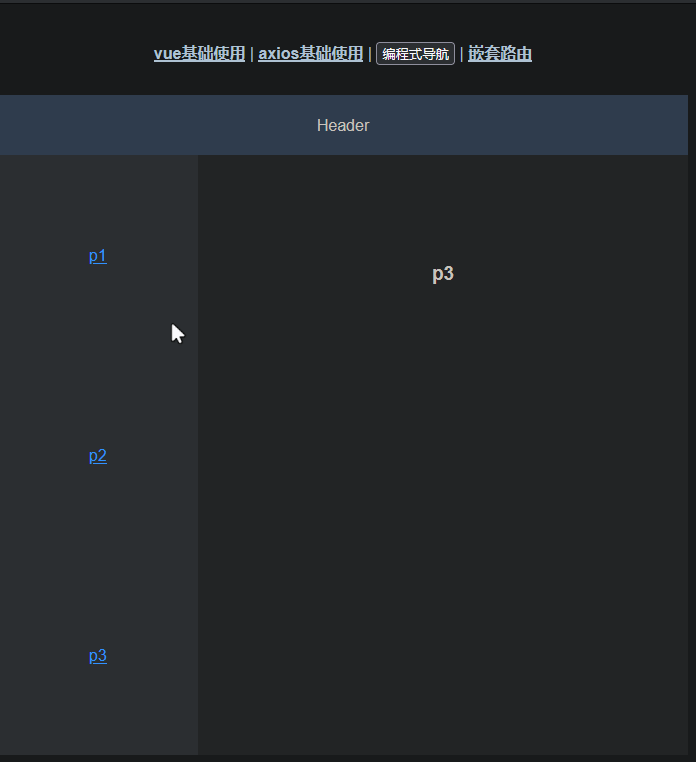
嵌套路由
嵌套路由:组件内要切换内容,就需要用到嵌套路由(子路由)
实现步骤
- 安装并导入ElementUI(方便布局),使用方法官网很详细
npm i element-ui -S
在 main.js 导入(完整导入)
import Vue from 'vue';
import ElementUI from 'element-ui';
import 'element-ui/lib/theme-chalk/index.css';
import App from './App.vue';

Vue.use(ElementUI);

new Vue({
  el: '#app',
  render: h => h(App)
});
按需导入参考官网:quickStart
-
⚠️:.babelrc可能会报错 es2005 的模块无法使用,那么就按如下操作
- 安装 Babel 7 及相关插件
npm install --save-dev @babel/core @babel/preset-env babel-plugin-component
	2.  更新 Babel 配置文件

```json
json{
  "presets": [["@babel/preset-env", { "modules": false }]],
  "plugins": [
    [
      "component",
      {
        "libraryName": "element-ui",
        "styleLibraryName": "theme-chalk"
      }
    ]
  ]
}
- 创建容器布局
ContainerView.vue:
<script>
export default {
  name: 'ContainerView'
}
</script>

<template>
  <el-container>
    <el-header>Header</el-header>
    <el-container>
      <el-aside width="200px">
        <router-link to="/container/p1">p1</router-link>
        <br>
        <router-link to="/container/p2">p2</router-link>
        <br>
        <router-link to="/container/p3">p3</router-link>
      </el-aside>
      <el-main>
        <router-view />
      </el-main>
    </el-container>
  </el-container>
</template>

<style scoped>
.el-header, .el-footer {
  background-color: #B3C0D1;
  color: #333;
  text-align: center;
  line-height: 60px;
}

.el-aside {
  background-color: #D3DCE6;
  color: #333;
  text-align: center;
  line-height: 200px;
}

.el-main {
  background-color: #E9EEF3;
  color: #333;
  text-align: center;
  line-height: 160px;
}

body > .el-container {
  margin-bottom: 40px;
}

.el-container:nth-child(5) .el-aside,
.el-container:nth-child(6) .el-aside {
  line-height: 260px;
}

.el-container:nth-child(7) .el-aside {
  line-height: 320px;
}
</style>
- 创建子组件
P1View:(其他的一样,就是内容进行替换成了p2 p3)
<script>
export default {
  name: 'P1View'
}
</script>

<template>
  <div>
    <h1>p1</h1>
  </div>
</template>

<style scoped>

</style>
- 配置路由
{
  path: '/container',
  name: 'container',
  component: () => import('@/views/container/ContainerView.vue'),
  redirect: '/container/p1',
  children: [
    {
      path: '/container/p1',
      name: 'p1',
      component: () => import('@/views/container/P1View.vue')
    },
    {
      path: '/container/p2',
      name: 'p2',
      component: () => import('@/views/container/P2View.vue')
    },
    {
      path: '/container/p3',
      name: 'p3',
      component: () => import('@/views/container/P3View.vue')
    }
  ]
},
效果如下:
vuex状态管理
vuex介绍
- vuex 是一个专为 Vue.js 应用程序开发的状态管理库
- vuex 可以在多个组件之间共享数据,并且共享的数据是响应式的,即数据的变更能及时渲染到模板
- vuex 采用集中式存储管理所有组件的状态
vuex安装
pnpm i vuex@next --save
也可以使用 vue ui
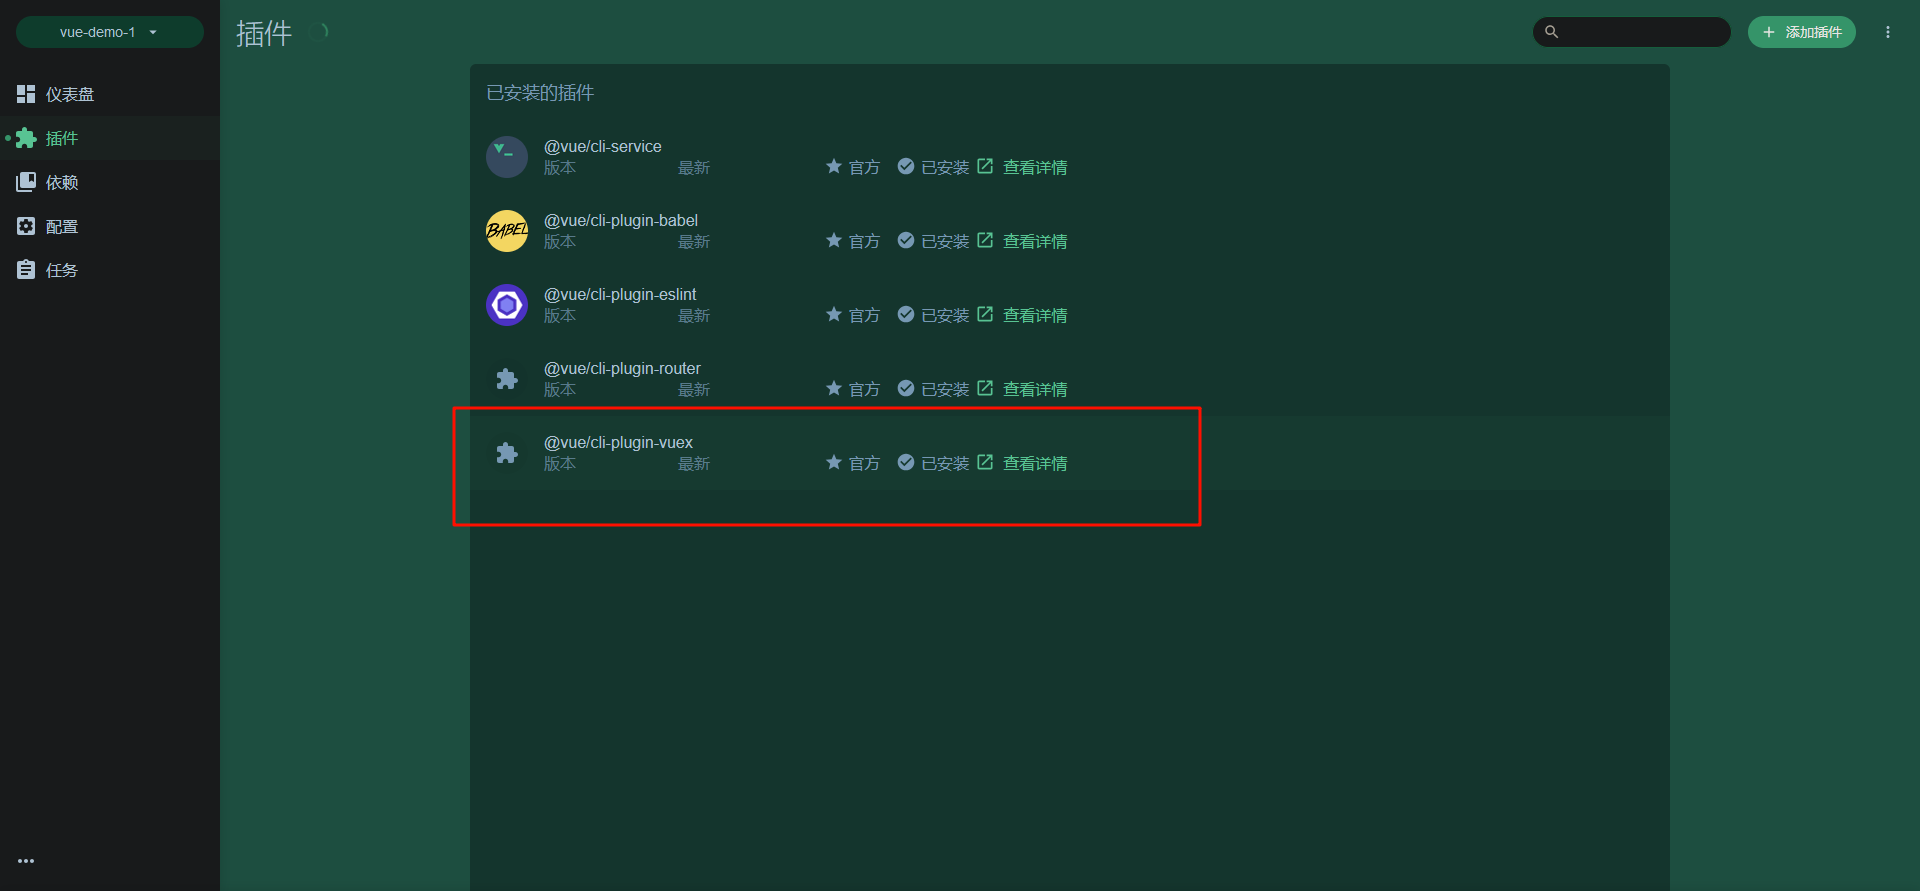
具体安装教程参考:Vue-Router的安装
核心概念
- state:状态对象,集中定义各个组件共享的数据
- mutations:类似于一个事件,用于修改共享数据,要求必须是同步函数
- actions:类似于mutation,可以包含异步操作,通过调用mutation来改变共享数据
使用方式
前置配置:
main.js
import Vue from 'vue'
import App from './App.vue'
import router from './router'
import store from './store'

Vue.config.productionTip = false

new Vue({
  router,
  store,  // 将store绑定到全局函数中
  render: h => h(App)
}).$mount('#app')
state的使用
import Vue from 'vue'
import Vuex from 'vuex'

Vue.use(Vuex)

export default new Vuex.Store({
  state: { // 状态对象,集中定义各个组件共享的数据,可以理解为全局的 data()
    name: '未登录游客'
  },
  getters: {
  },
  mutations: { // 用于修改共享数据,要求必须是同步函数
  },
  actions: { // 通过actions可以调用mutations,actions可以进行异步操作
  },
  modules: {
  }
})
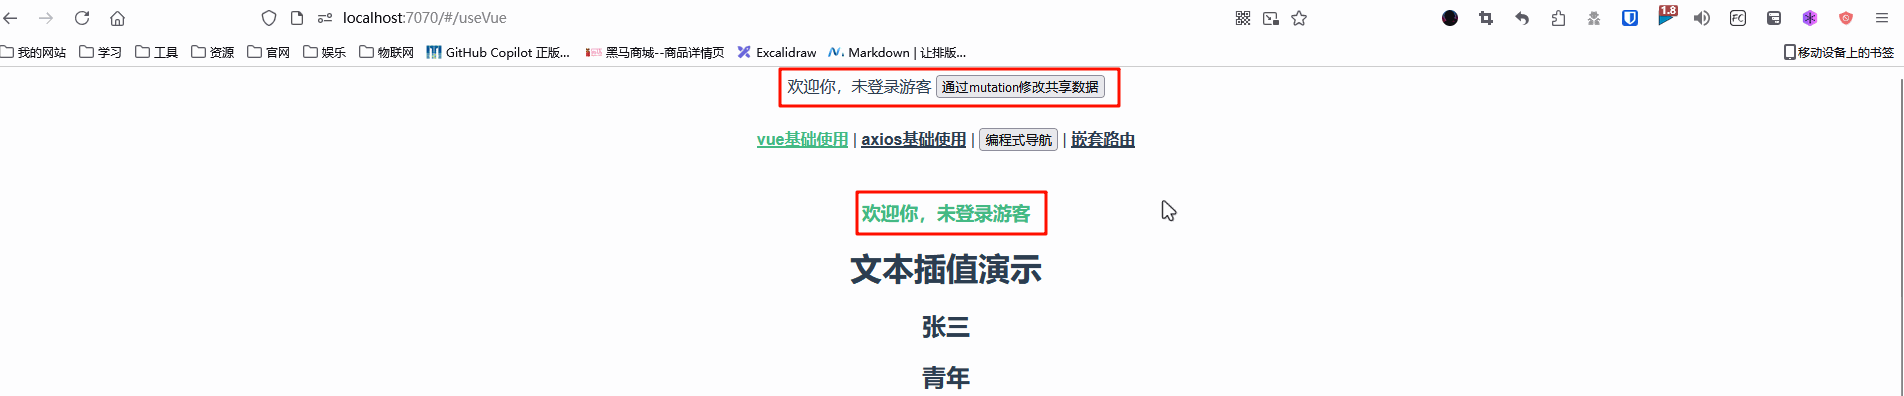
在页面中调用:
<template>
  <div id="app">
    欢迎你,{{ $store.state.name }}
    <nav>
      <router-link to="/useVue">vue基础使用</router-link> |
      <router-link to="/useAxios">axios基础使用</router-link> |
      <input type="button" value="编程式导航" @click="$router.push('/useVue')" /> |
      <router-link to="/container">嵌套路由</router-link>
    </nav>
    <router-view/>
  </div>
</template>

<style>
#app {
  font-family: Avenir, Helvetica, Arial, sans-serif;
  -webkit-font-smoothing: antialiased;
  -moz-osx-font-smoothing: grayscale;
  text-align: center;
  color: #2c3e50;
}

nav {
  padding: 30px;
}

nav a {
  font-weight: bold;
  color: #2c3e50;
}

nav a.router-link-exact-active {
  color: #42b983;
}
</style>
<script>
</script>
mutations的使用
整体参考:state
mutations: { // 用于修改共享数据,要求必须是同步函数
  setName (state, name) {
    state.name = name
  }
},
在页面中调用 mutations 中的函数
<template>
<div id="app">
欢迎你,{{ $store.state.name }}
<button @click="handleUpdate">通过mutation修改共享数据</button>
<nav>
<router-link to="/useVue">vue基础使用</router-link> |
<router-link to="/useAxios">axios基础使用</router-link> |
<input type="button" value="编程式导航" @click="$router.push('/useVue')" /> |
<router-link to="/container">嵌套路由</router-link>
</nav>
<router-view/>
</div>
</template>
<style>
#app {
font-family: Avenir, Helvetica, Arial, sans-serif;
-webkit-font-smoothing: antialiased;
-moz-osx-font-smoothing: grayscale;
text-align: center;
color: #2c3e50;
}
nav {
padding: 30px;
}
nav a {
font-weight: bold;
color: #2c3e50;
}
nav a.router-link-exact-active {
color: #42b983;
}
</style>
<script>
export default {
methods: {
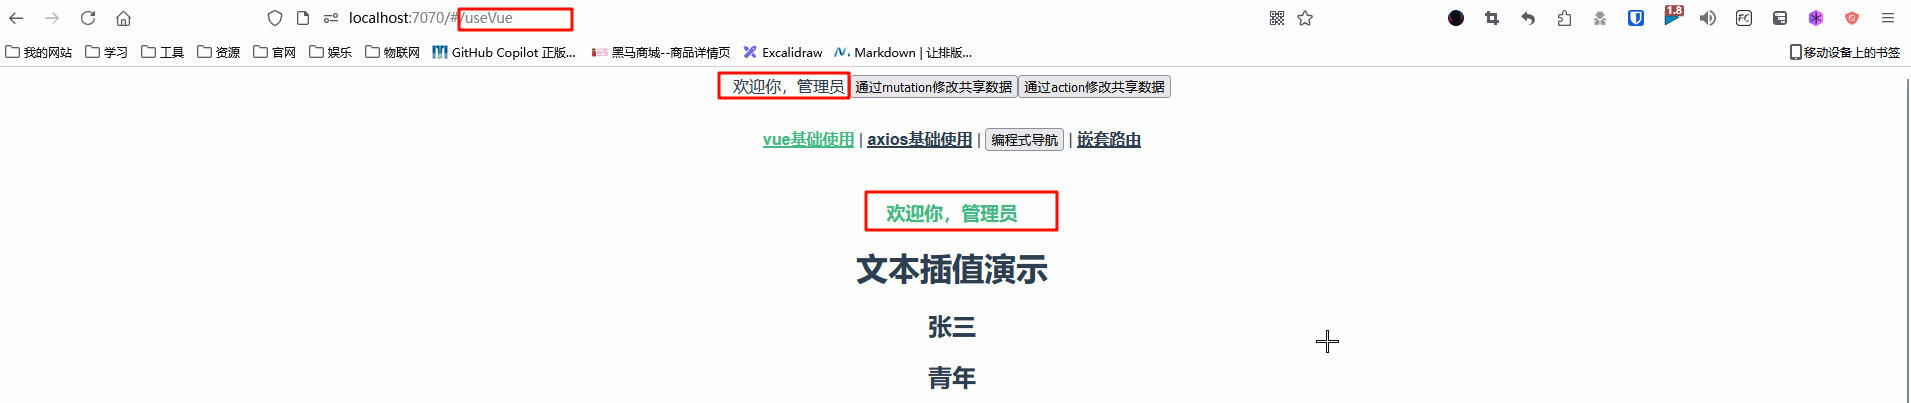
handleUpdate () {
// mutations 中的函数不能直接调用,必须用 this.$store.commit(函数,参数)
this.$store.commit('setName', 'lisi')
}
}
}
</script>
效果如下:

在不同页面都可以显示:
效果:
actions的使用
首先要解决跨域问题:跨域问题的解决
在 actions 中定义函数,用于调用 mutation
actions: { // 通过actions可以调用mutations,actions可以进行异步操作
  setNameByAxios (context) {
    axios.post('/api/employee/login', {
      username: 'admin',
      password: '123456'
    }).then(res => {
      // 调用 mutations 中的 setName 函数
      context.commit('setName', res.data.data.name)
    })
  }
},
在页面中调用 action
<button @click="$store.dispatch('setNameByAxios')">通过action修改共享数据</button>
效果如下:
TypeScipt基础
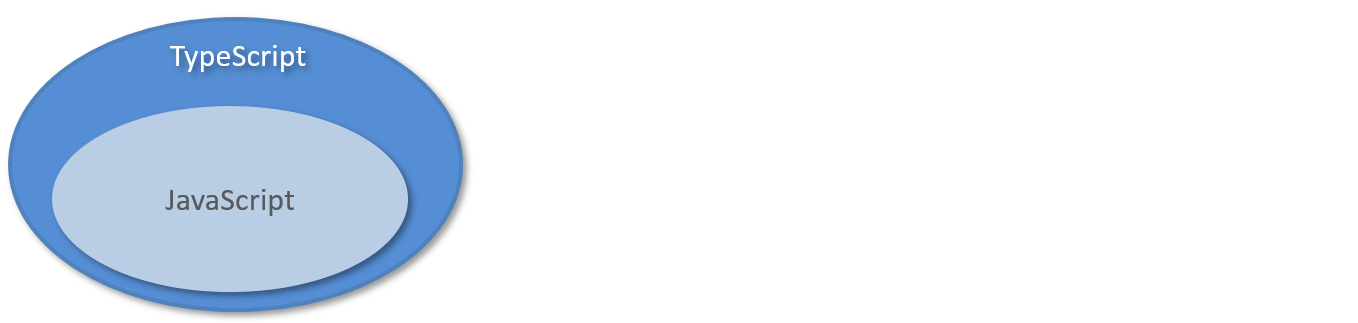
TypeScript介绍
- TypeScript(简称:TS) 是微软推出的开源语言
- TypeScript 是 JavaScript 的超集(JS 有的 TS 都有)
TypeScript有如下特点:
- TypeScript = Type + JavaScript(在 JS 基础上增加了类型支持)
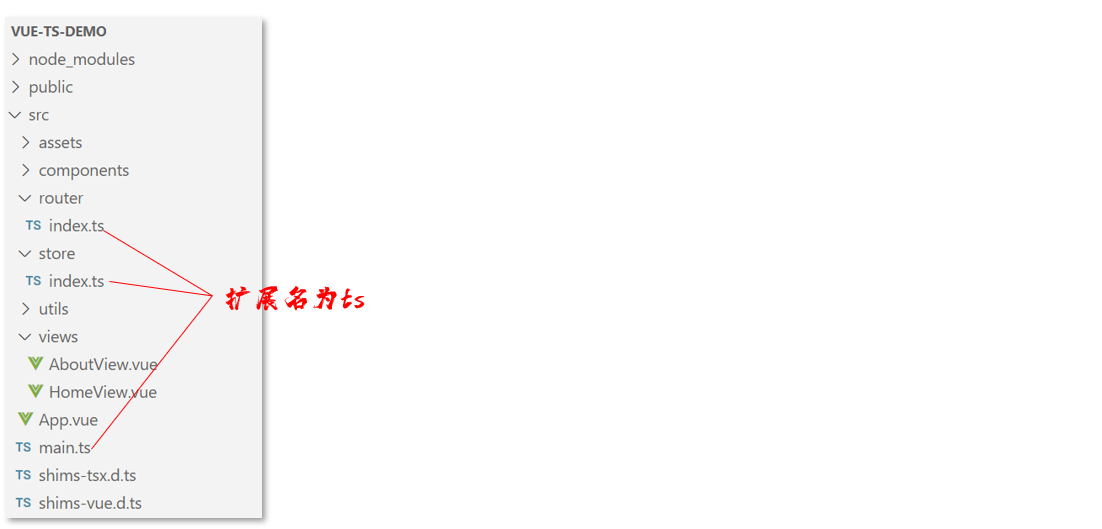
- TypeScript 文件扩展名为 .ts
- TypeScript 可编译成标准的 JavaScript,并且在编译时进行类型检查

TypeScript安装
全局安装:
npm install -g typescript
查看typescript版本:
tsc -v
# Version 5.5.4
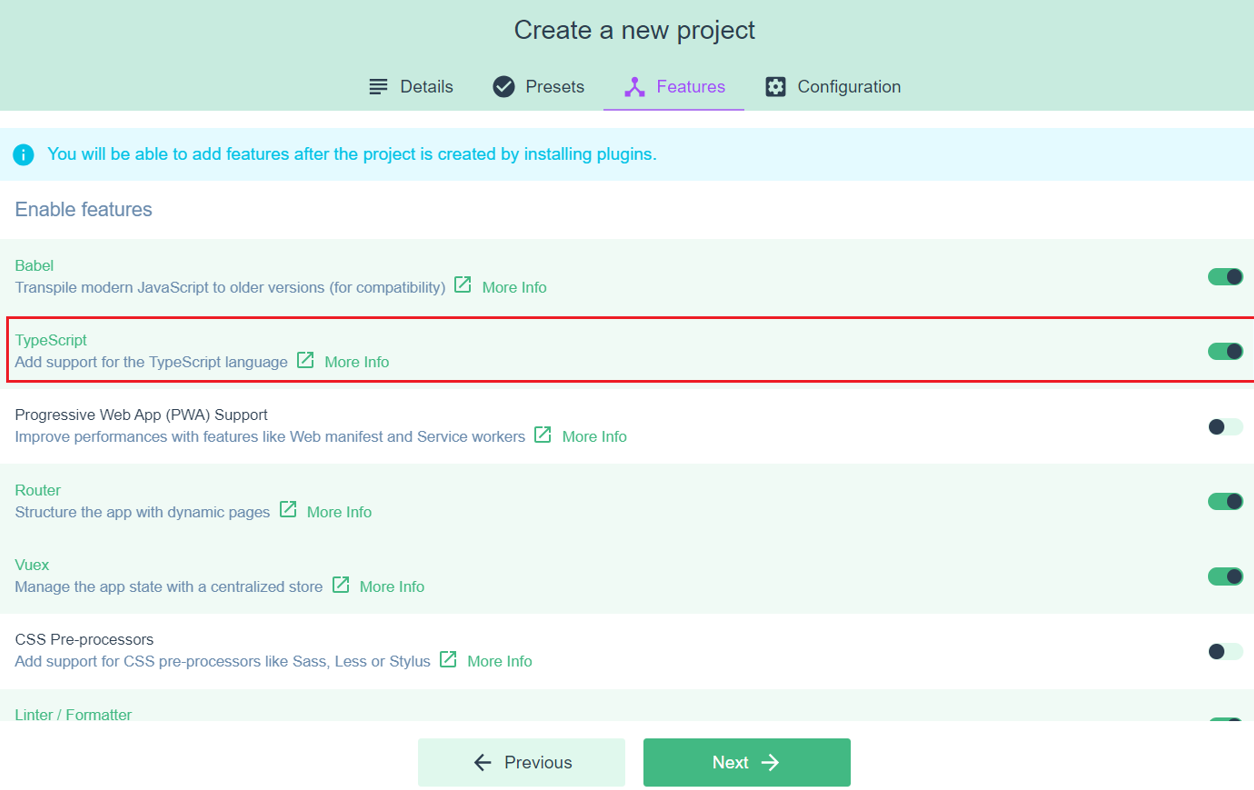
在前端项目中使用TS,需要创建基于TS的前端工程:
TypeScript特性
如介绍所示,TypeScript与JS的最大区别在于:静态类型,说明类型会进行检查,下面的程序可以证明这点:
// 定义一个函数 hello,并且指定参数类型为 string
function hello(msg:string) {
	console.log(msg)
}

// 调用函数,传递非 string 类型的参数
hello(123)
运行结果如下:

思考:TS 为什么要增加类型支持 ?
- TS 属于静态类型编程语言,JS 属于动态类型编程语言
- 静态类型在编译期做类型检查,动态类型在执行期做类型检查
- 对于 JS 来说,需要等到代码执行的时候才能发现错误(晚)
- 对于 TS 来说,在代码编译的时候就可以发现错误(早)
- 配合 VSCode 开发工具,TS 可以提前到在编写代码的同时就发现代码中的错误,减少找 Bug、改 Bug 的时间
TypeScript常用类型
TS中的常用类型如下:
| 类型 | 例 | 备注 |
|---|---|---|
| 字符串类型 | string | |
| 数字类型 | number | |
| 布尔类型 | boolean | |
| 数组类型 | number[],string[], boolean[] 依此类推 | |
| 任意类型 | any | 相当于又回到了没有类型的时代 |
| 复杂类型 | type 与 interface | |
| 函数类型 | () => void | 对函数的参数和返回值进行说明 |
| 字面量类型 | "a"|"b"|"c" | 限制变量或参数的取值 |
| class 类 | class Animal |
类型标注的位置
基于TS进行前端开发时,类型标注的位置有如下3个:
- 标注变量
- 标注参数
- 标注返回值
// 标注变量,指定变量 msg 的类型为 string
const msg:string = 'welcome to ts !'

// 标注参数和返回值,指定 m2 函数的参数类型为 string 并且返回值也为 string
const m2 = (name: string):string => {
  return name.toLowerCase() + ' ' + msg
}

console.log(m2('zxb'))
字符串、数字、布尔类型
// 定义字符串类型的变量
const username: string = 'administartor'

// 定义布尔类型的变量
const isTrue: boolean = false

// 定义数字类型
const age: number = 20

console.log(username)
console.log(isTrue)
console.log(age)
字面量类型
字面量类型用于限定数据的取值范围,类似于java中的枚举
// 字面量类型,指定参数 alignment 的取值只能是 left、right、center
function printText (s: string, alignment: 'left' | 'right' | 'center') {
  console.log(s, alignment)
}

printText('hello', 'left')
printText('hello', 'bottom') // error

interface类型
interface 类型是TS中的复杂类型,它让 TypeScript 具备了 JavaScript 所缺少的、描述较为复杂数据结构的能力。
// 定义一个接口,名字为 Catinterface Cat {
  name: string,
  age: number
}

// 定义变量为 Cat 类型
const c1: Cat = { name: '小白', age: 1 }
const c2: Cat = { name: '小花' }
const c3: Cat = { name: '小黑', age: 1, sex: '公' }

console.log(c1, c2, c3)
报错如下:

可以通过在属性名后面加上?,表示当前属性为可选,如下:
// 定义一个接口,名字为 Catinterface Cat {
  name: string,
  age?: number
}

// 定义变量为 Cat 类型
const c1: Cat = { name: '小白', age: 1 }
const c2: Cat = { name: '小花' }
console.log(c1, c2)
class类型
使用 class 关键字来定义类,类中可以包含属性、构造方法、普通方法等
class User {
  name: string // 属性
  constructor (name: string) { // 构造方法
    this.name = name
  }

  study () { // 方法
    console.log(`[${this.name}]正在学习`)
  }
}

const u = new User('张三')

console.log(u.name)
u.study()
在定义类时,可以使用 implments 关键字实现接口,如下:
interface Animal {
  name: string
  eat (): void
}

// 实现接口
class Bird implements Animal {
  name: string
  constructor (name: string) {
    this.name = name
  }
  eat () {
    console.log(this.name + ' is eating')
  }
}

// 创建对象
const bird = new Bird('杜鹃')
console.log(bird.name)
bird.eat()
有实现当然也可以继承其他类,如下:
interface Animal {
  name: string
  eat (): void
}

// 实现接口
class Bird implements Animal {
  name: string
  constructor (name: string) {
    this.name = name
  }
  eat () {
    console.log(this.name + ' is eating')
  }
}

// 创建对象
const bird = new Bird('杜鹃')
console.log(bird.name)
bird.eat()

// 定义Parrot类,继承 Birdclass Parrot extends Bird {
  say (): void {
    console.log(this.name + ' say hello')
  }
}
const myParrot = new Parrot('polly')
myParrot.say()
myParrot.eat()
前端环境搭建、员工管理
前端环境搭建
- 直接导入课程资料中提供的前端工程,在此基础上开发即可。
注意:node > 15 的版本无法安装依赖 fiber 等,需要切换到 15 以下
方便切换node版本的工具:nvm-windows
前端代码结构
如下:
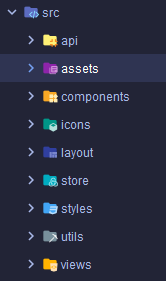
- api:存放封装了Ajax请求文件的目录
- components:公共组件存放目录
- views:存放视图组件的目录
- App.vue:项目的主组件,页面的入口文件
- main.ts:整个项目的入口文件
- router.ts:路由文件
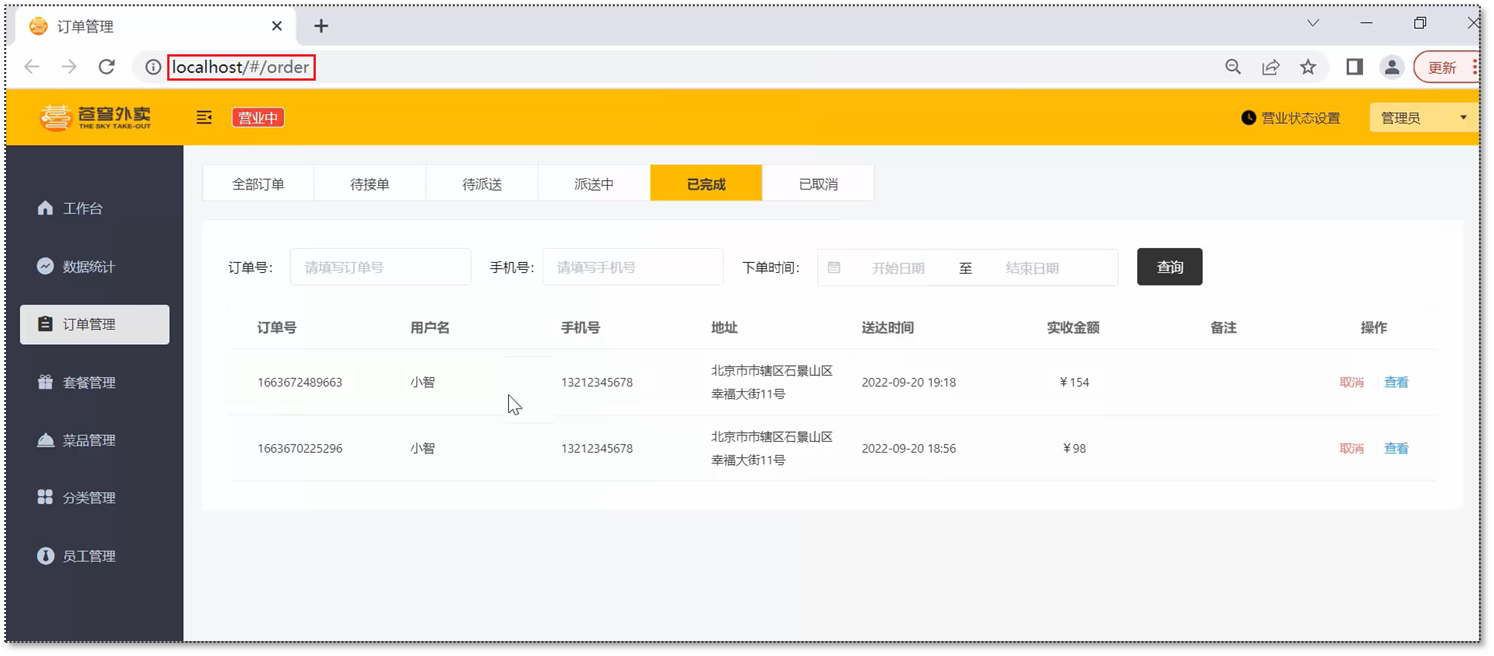
员工分页查询
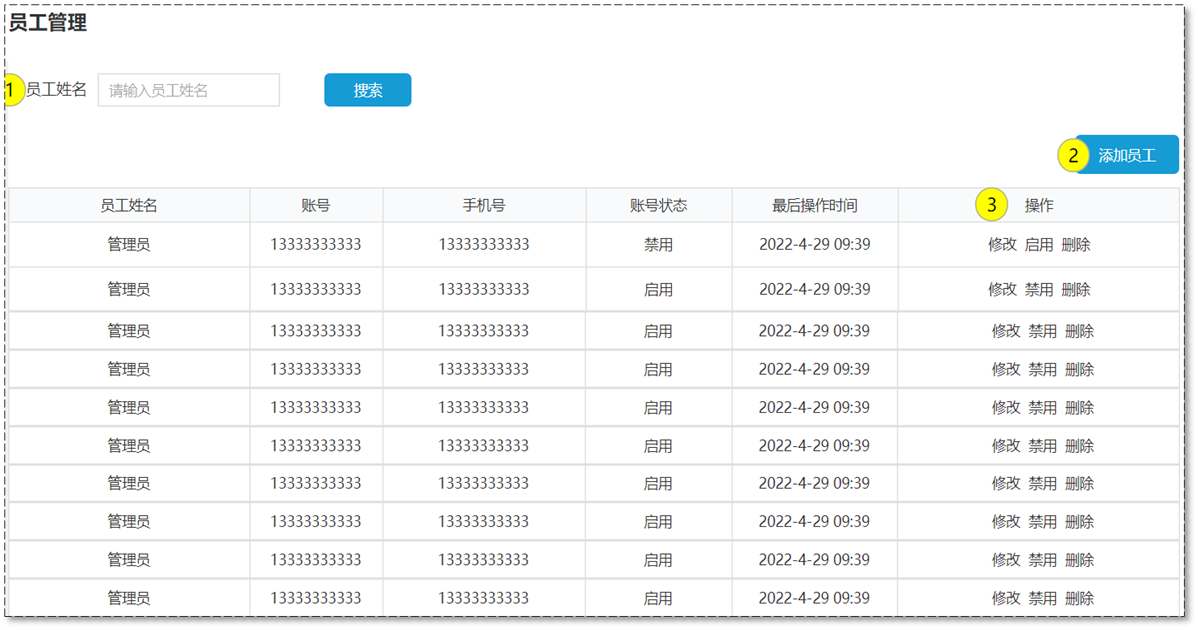
需求分析和接口设计
产品原型:
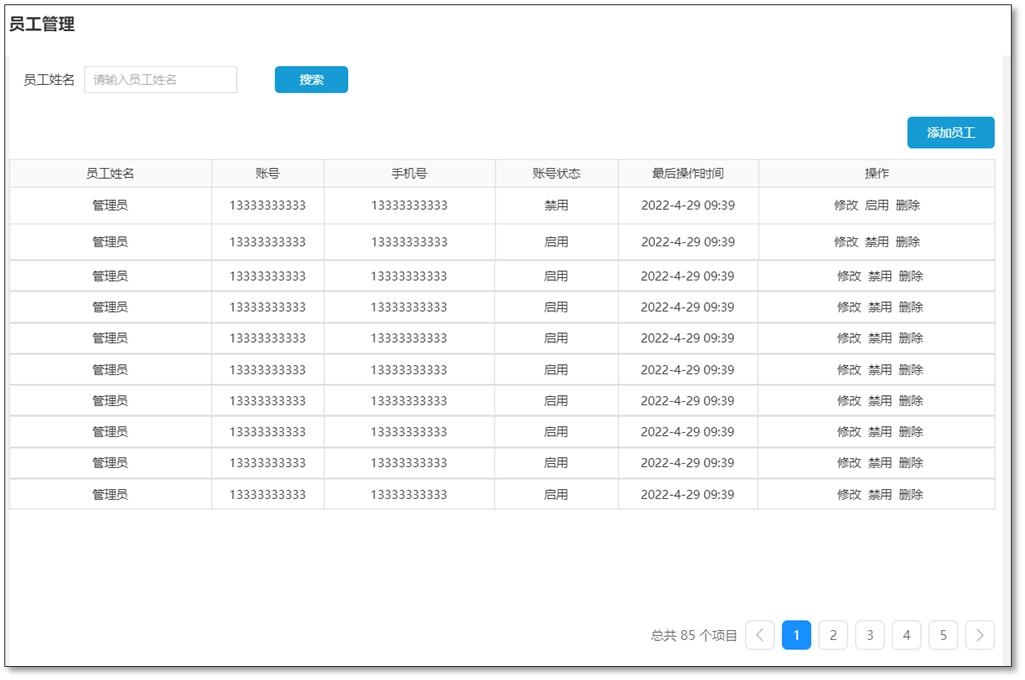
业务规则:
- 根据页码展示员工信息
- 每页展示10条数据
- 分页查询时可以根据需要,输入员工姓名进行查询
接口设计:

实现代码
因为项目结构都已经设计好了,只需要实现即可,因此,在 router.ts 中可以定位到 员工管理 模块的vue文件:
index.vue
<template>
  <div class="dashboard-container">
    <div class="container" />
  </div>
</template>
<script lang="ts">

export default {

}
</script>

<style lang="scss" scoped>
.disabled-text {
  color: #bac0cd !important;
}
</style>
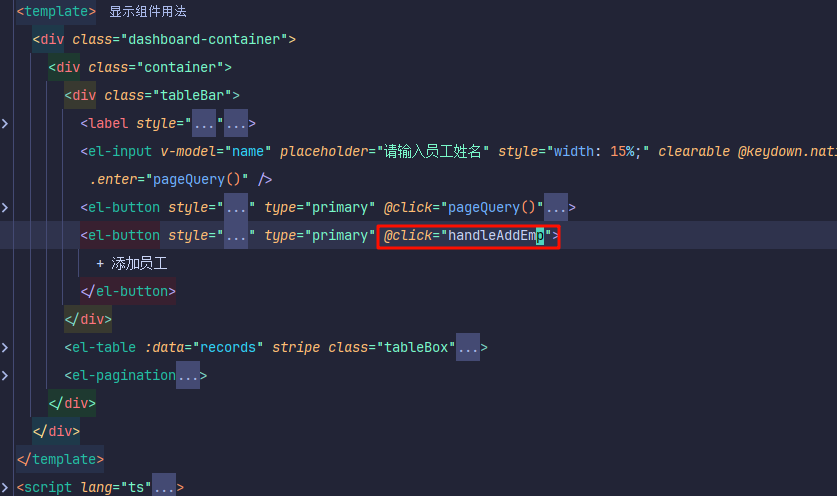
制作页面头部

<div class='container'>中添加代码如下
<div class="tableBar">
  <label style="margin-right: 5px;">
    员工姓名:
  </label>
  <el-input placeholder="请输入员工姓名" style="width: 15%;" />
  <el-button style="margin-left: 25px;" type="primary" @click="pageQuery()">
    查询
  </el-button>
  <el-button style="float: right" type="primary">
    + 添加员工
  </el-button>
</div>
初步编写PageQuery()处理逻辑
- 在
api/employee.ts中定义getEmpoloyeeList
// 分页查询
export const getEmployeeList = (params: any) =>
  request({
    url: '/employee/page',
    method: 'get',
    params
  })
index.vue添加如下:
methods: {
  pageQuery (): void {
    getEmployeeList({name: '', page: 1, pageSize: 10})
  }
}
编写数据模型
刚刚的 pageQuery 是写死的,为了灵活使用,我们可以进行如下操作:
- data() 方法中定义分页相关的模型数据
indx.vue:
data () {
  return {
    name: '', // 员工姓名
    page: 1, // 页码
    pageSize: 10, // 每页记录数
    total: 0, // 总记录数
    records: [] // 当前页面要展示的数据集合
  }
},
- 与页面头部对name属性进行双向绑定
<div class="tableBar">
  <label style="margin-right: 5px;">
    员工姓名:
  </label>
  <-----此部分额外加了一个监听enter的事件----->
  <el-input v-model="name" placeholder="请输入员工姓名" style="width: 15%;" @keydown.native.enter="pageQuery()" />
  <el-button style="margin-left: 25px;" type="primary" @click="pageQuery()">
    查询
  </el-button>
  <el-button style="float: right" type="primary">
    + 添加员工
  </el-button>
</div>
pageQuery调用数据模型
// 分页查询
pageQuery (): void {
  // 准备参数
  const params = {
    page: this.page,
    pageSize: this.pageSize,
    name: this.name
  }
  // 发送请求
  getEmployeeList(params).then( res => {
    // 解析结果
    if (res.data.code === 1) {
      this.records = res.data.data.records
      this.total = res.data.data.total
    }
  }).catch( err => {
    this.$message.error('请求出错了:' + err.message)
  })
}
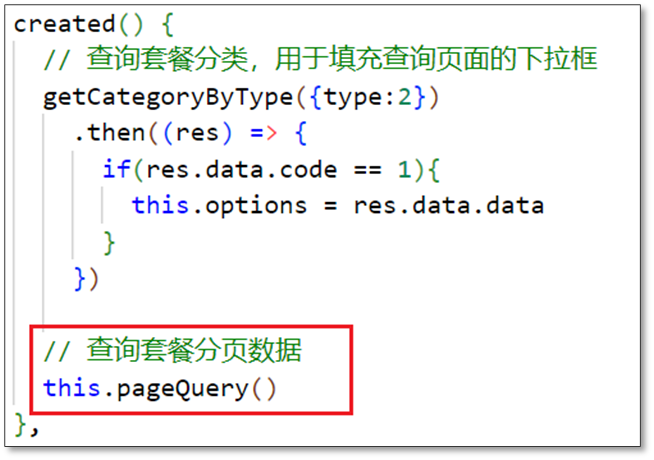
初始化查询
使用 vue的 created 函数,可以使页面加载后就查询分页数据
created() {
  this.pageQuery()
},
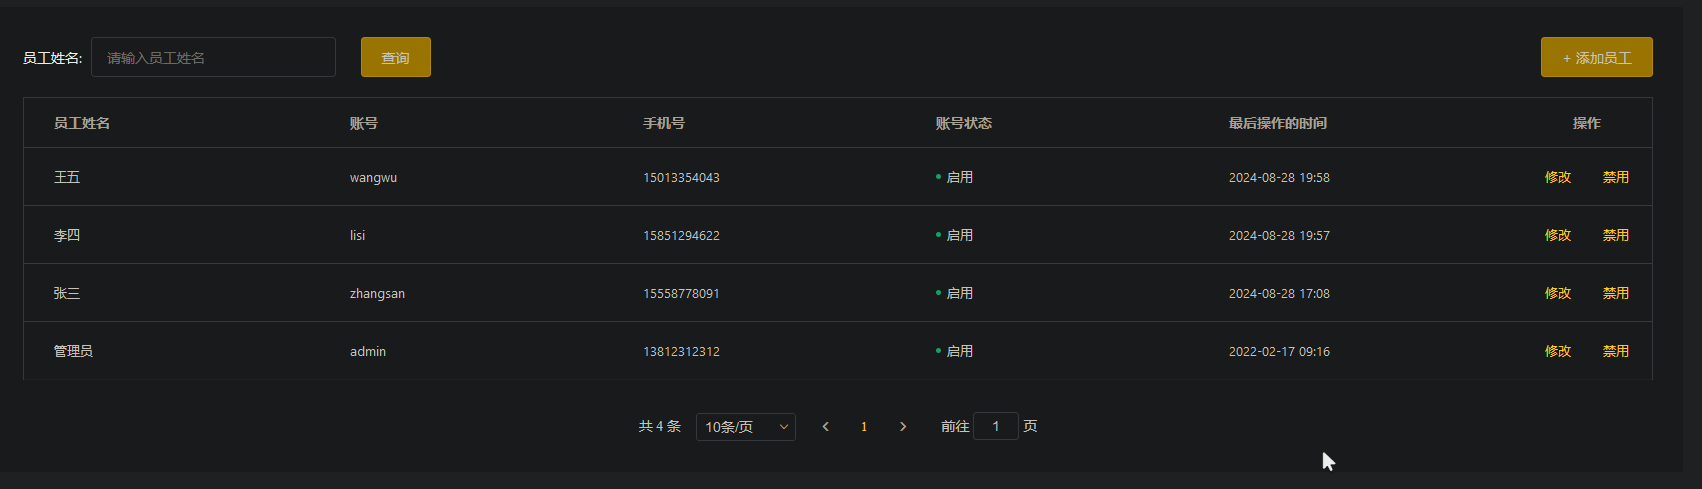
展示分页数据
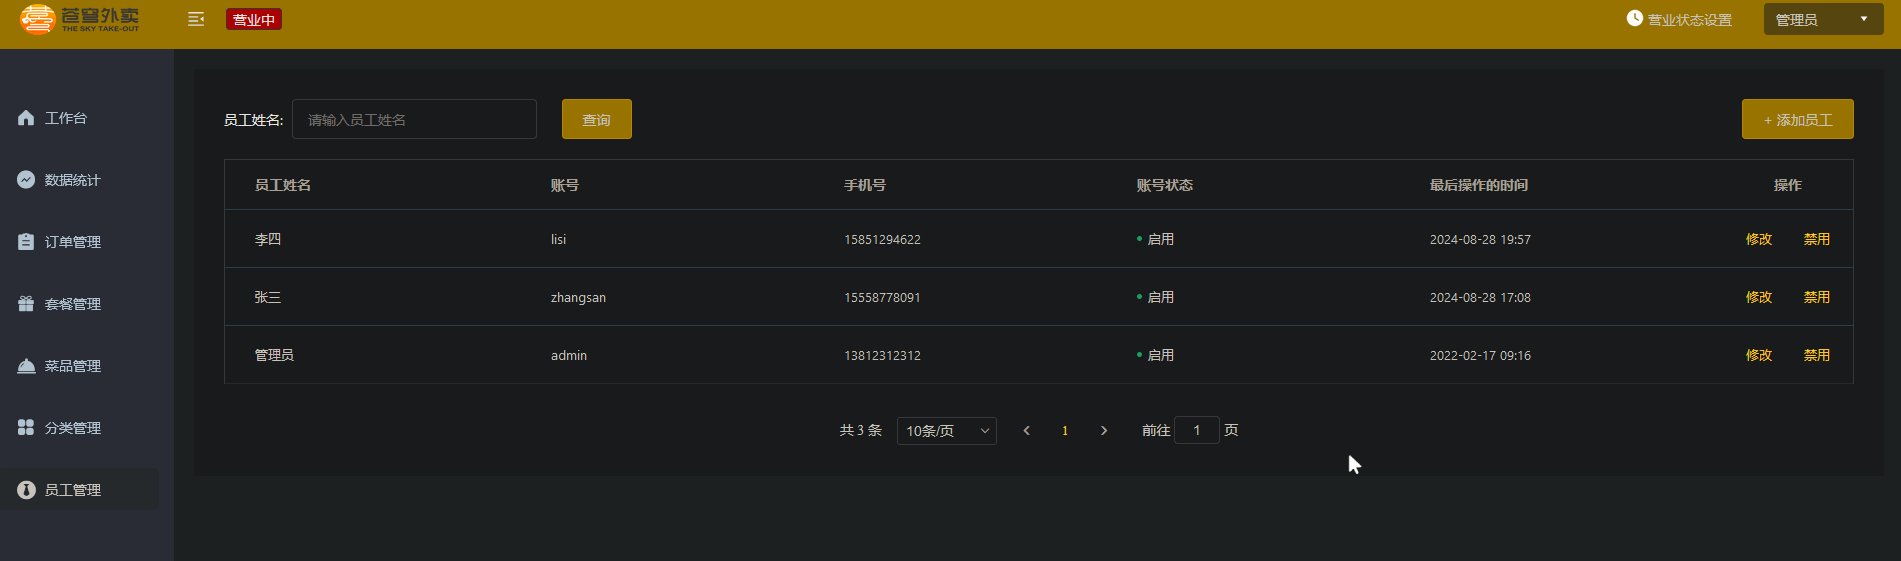
- 使用 ElementUI 提供的表格组件展示分页数据
<div class="tableBar">下:
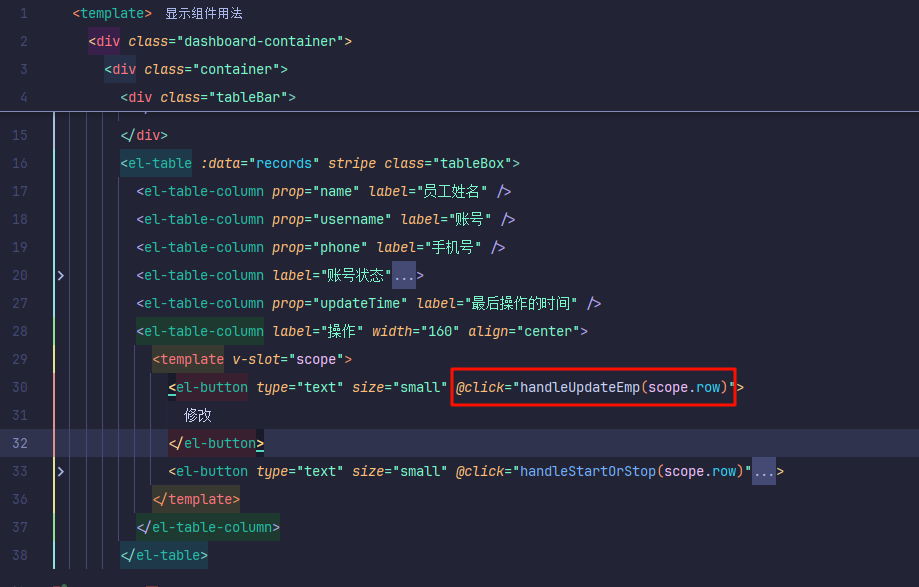
<el-table :data="records" stripe class="tableBox">
  <el-table-column prop="name" label="员工姓名" />
  <el-table-column prop="username" label="账号" />
  <el-table-column prop="phone" label="手机号" />
  <el-table-column label="账号状态">
    <template v-slot="scope">
      <div class="tableColumn-status" :class="{ 'stop-use' : scope.row.status === 0}">
        {{ scope.row.status === 0 ? '禁用' : '启用' }}
      </div>
    </template>
  </el-table-column>
  <el-table-column prop="updateTime" label="最后操作的时间" />
  <el-table-column label="操作" width="160" align="center">
    <template v-slot="scope">
      <el-button type="text" size="small">
        修改
      </el-button>
      <el-button type="text" size="small">
        {{ scope.row.status === 1 ? '禁用' : '启用' }}
      </el-button>
    </template>
  </el-table-column>
</el-table>
- 使用 ElementUI 提供的分页条组件,并绑定事件处理函数
<el-table>下:
<el-pagination
  class="pageList"
  :page-sizes="[10, 20, 30, 40, 50]"
  :page-size="pageSize"
  layout="total, sizes, prev, pager, next, jumper"
  :total="total"
  @size-change="handleSizeChange"
  @current-change="handleCurrentChange"
/>
对应的处理函数:
// 分页条事件处理,pageSize 改变时触发
handleSizeChange (pageSize): void {
  this.pageSize = pageSize
  this.pageQuery()
},
// 分页条事件处理,currentPage 改变时触发
handleCurrentChange(page): void {
  this.page = page
  this.pageQuery()
}
目前实现效果如下:
启用、禁用员工账号
需求分析和接口设计
产品原型
接口设计

代码实现
在employee.ts中封装启用禁用员工账号方法,发送Ajax请求
// 启用禁用员工账号
export const enableOrDisableEmployee = (params: any) => {
  return request({
    url: `/employee/status/${params.status}`,
    method: 'post',
    params: { id: params.id }
  })
}
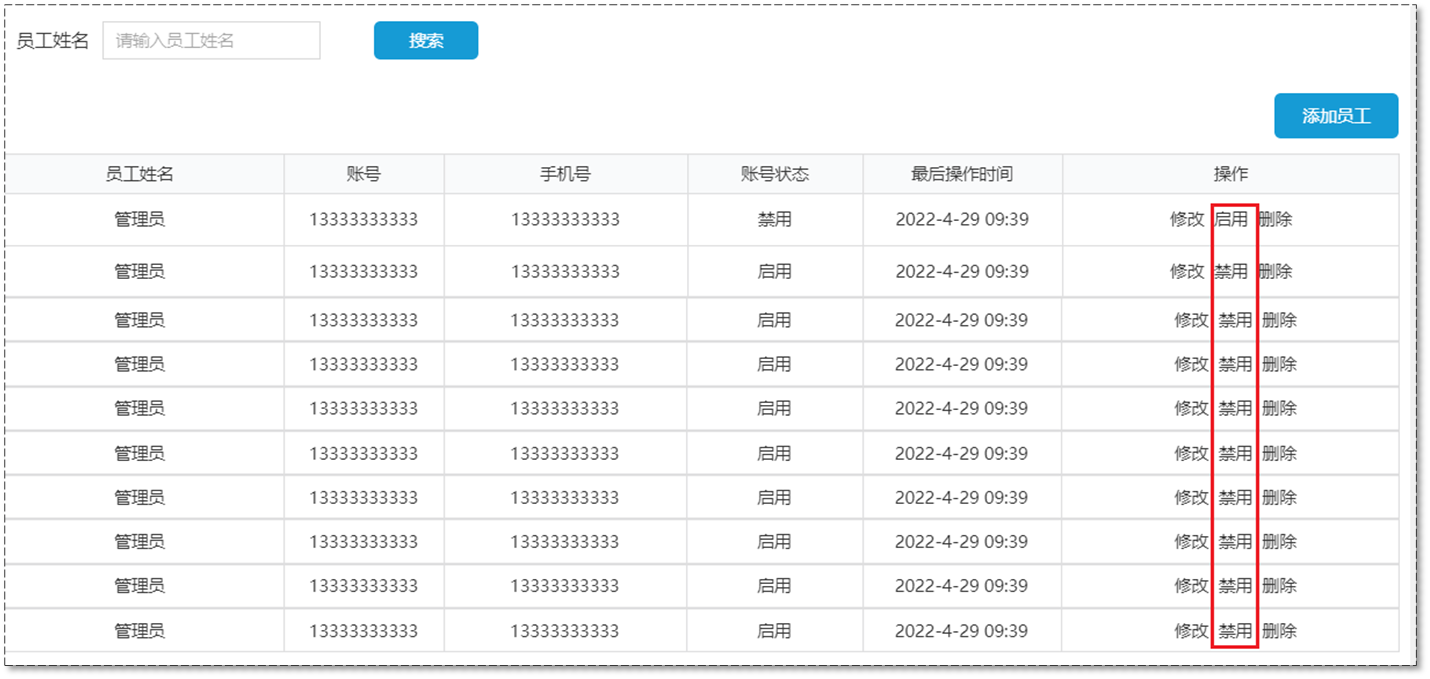
为启用、禁用按钮绑定单击事件
- 在之前的展示分页数据的代码中,添加
@click
<el-button type="text" size="small" @click="handleStartOrStop(scope.row)">
  {{ scope.row.status === 1 ? '禁用' : '启用' }}
</el-button>
- 编写逻辑:
// 启用、禁用员工账号
handleStartOrStop(row) {
  this.$confirm('确认调整该账号的状态?', '提示', {
    confirmButtonText: '确定',
    cancelButtonText: '取消',
    type: 'warning'
  }).then(() => {
    enableOrDisableEmployee({ id: row.id, status: !row.status ? 1 : 0 }).then(res => {
      if (res.status === 200) {
        this.$message.success('账号状态更改成功!')
        this.pageQuery()
      }
    }).catch( err => {
      this.$message.error('请求出错了:' + err.message)
    })
  })
}
在此基础上,可以对管理员身份进行判断,不允许更改管理员账户状态
// 启用、禁用员工账号
handleStartOrStop(row) {
  if (row.username === 'admin') {
    this.$message.error('admin为管理员账号,不能更改账号状态!')
    return
  }
  this.$confirm('确认调整该账号的状态?', '提示', {
    confirmButtonText: '确定',
    cancelButtonText: '取消',
    type: 'warning'
  }).then(() => {
    enableOrDisableEmployee({ id: row.id, status: !row.status ? 1 : 0 }).then(res => {
      if (res.status === 200) {
        this.$message.success('账号状态更改成功!')
        this.pageQuery()
      }
    }).catch( err => {
      this.$message.error('请求出错了:' + err.message)
    })
  })
}
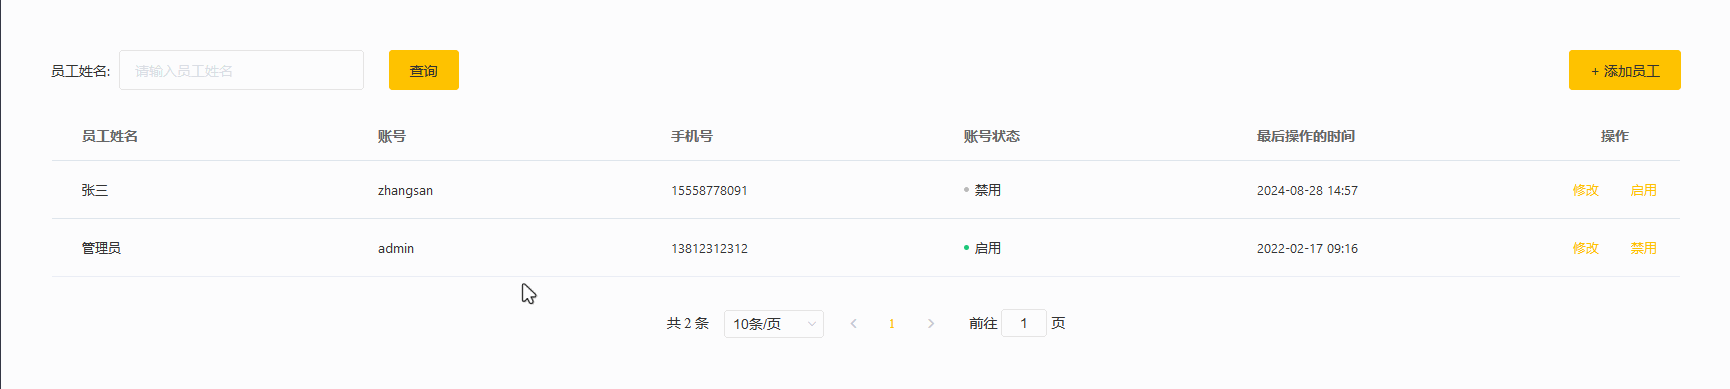
最终效果如下:
新增员工
需求分析和接口设计
项目原型
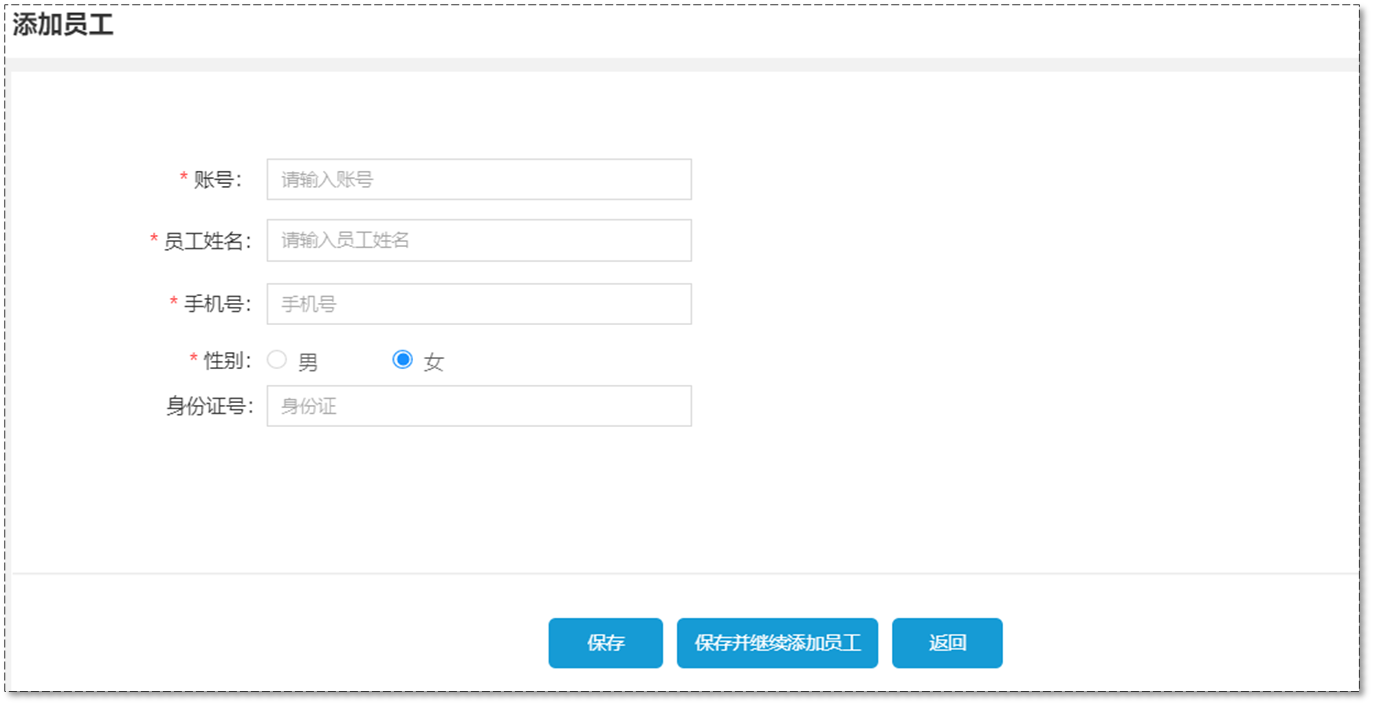
接口设计
代码实现
为 “添加员工”按钮绑定单击事件,跳转到添加表单页面
- 为 “添加员工”按钮绑定单击事件
- 提供 handleAddEmp 方法,进行路由跳转
// 添加员工,跳转至员工添加页面
handleAddEmp() {
  this.$router.push('/employee/add')
}
[!NOTE] tips
已经在路由文件添加了路由规则:

开发添加员工页面

此处页面无需自己编写,初始工程已经写好了
定义模型数据和表单校验规则
  data () {
    return {
      ruleForm: {
        name: '',
        username: '',
        sex: '1',
        phone: '',
        isNumber: ''
      },
      rules: {
        name: [
          { require: true, message: '请输入员工姓名', trigger: 'blur' }
        ],
        username: [
          { require: true, message: '请输入账号', trigger: 'blur' }
        ],
        phone: [
          { require: true,
trigger: 'blur',
validator: (rule, value, callback) => {
            if (value === '' || (!/^1([345678])\d{9}$/.test(value))) {
              callback(new Error('请输入正确的手机号'))
            } else {
              callback()
            }
            } }
        ],
        idNumber: [
          { require: true,
            trigger: 'blur',
            validator: (rule, value, callback) => {
              if (value === '' || (!/(^\d{15}$)|(^\d{18}$)|(^\d{17}(\d|X|x)$)/.test(value))) {
                callback(new Error('请输入正确的身份证号'))
              } else {
                callback()
              }
            } }
        ]
      }
    }
  }
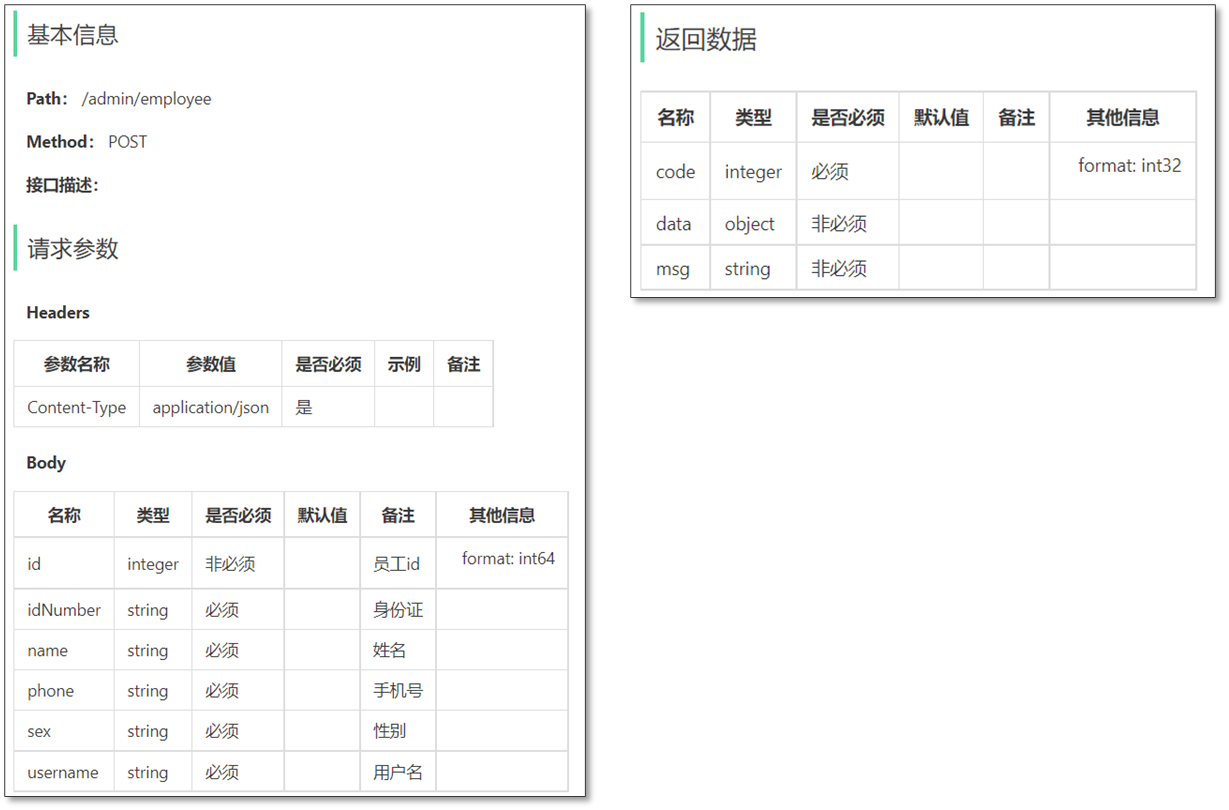
在employee.ts中封装新增员工方法,发送Ajax请求
// 新增员工
export const addEmployee = (param: any) => {
  return request({
    url: '/employee',
    method: 'post',
    data: param
  })
}
在 methods 中定义提交表单的方法
// 提交表单数据
submitForm(formName, isContinue) {
  // 表单数据校验
  this.$refs[formName].validate(valid => {
    if (valid) {
      addEmployee(this.ruleForm).then(res => {
        if (res.data.code === 1) {
          this.$message.success('员工添加成功!')
          if (isContinue) {
            this.$router.push('/employee')
          } else {
            this.ruleForm = {
              name: '',
              username: '',
              sex: '1',
              phone: '',
              isNumber: ''
            }
          }
        } else {
          this.$message.error(res.data.msg)
        }
      })
    }
  })
}
最终效果演示:
修改员工
需求分析与接口设计
产品原型
接口设计
代码实现
在员工管理页面中,为“修改”按钮绑定单击事件,用于跳转到修改页面
在员工管理页面中,为“修改”按钮绑定单击事件
<el-button type="text" size="small" @click="handleUpdateEmp(scope.row)">
  修改
</el-button>
编写跳转到修改页面逻辑
// 修改员工,跳转至员工修改页面
handleUpdateEmp(row) {
  if (row.username === 'admin') {
    // 内置管理员无法修改
    this.$message.error('admin为管理员账号,无法修改!')
    return
  }
  this.$router.push({ path: '/employee/add', query: {id: row.id} })
}
addEmployee添加修改逻辑
employee.ts创建方法发送ajax请求
// 根据id查询员工
export const queryEmployeeById = (id: number) => {
  return request({
    url: `/employee/${id}`,
    method: 'get'
  })
}

// 修改员工
export const updateEmployee = (params: any) => {
  return request({
    url: '/employee',
    method: 'put',
    data: params
  })
}
由于 addEmployee.vue 为新增和修改共用页面,需要能够区分当前操作:
- 如果路由中传递了id参数,则当前操作为修改
- 如果路由中没有传递id参数,则当前操作为新增
首先定义变量进行区分:
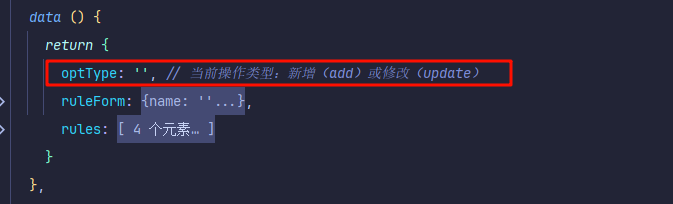
然后在 created 区间时进行判断,是新增还是修改
created() {
  // 获取路由参数,判断操作为新增还是修改
  this.optType = this.$route.query.id ? 'update' : 'add'
},
在修改员工页面的 created 方法中查询员工原始信息用于页面数据回显
created() {
  // 获取路由参数,判断操作为新增还是修改
  this.optType = this.$route.query.id ? 'update' : 'add'
  if (this.optType === 'update') {
    // 修改操作,需要根据id进行回显
    queryEmployeeById(this.$route.query.id).then(res => {
      if (res.data.code === 1) this.ruleForm = res.data.data
    })
  }
},
如果是修改操作,“保存并继续添加员工”按钮则不需要显示
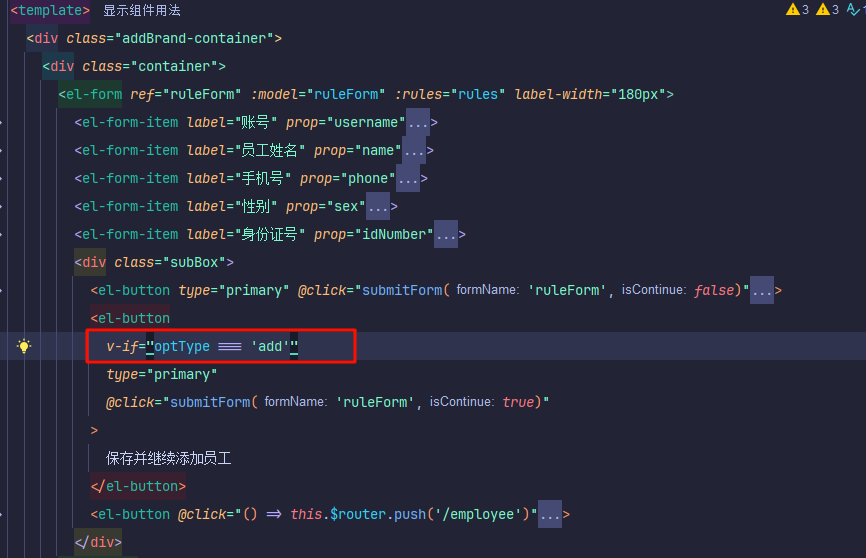
修改 submitForm 方法,需要根据当前操作类型执行新增或者修改操作
submitForm(formName, isContinue) {
  // 表单数据校验
  this.$refs[formName].validate(valid => {
    if (valid) {
      // 根据操作类型进行新增或修改
      if (this.optType === 'add') {
        addEmployee(this.ruleForm).then(res => {
          if (res.data.code === 1) {
            this.$message.success('员工添加成功!')
            if (isContinue) {
              this.$router.push('/employee')
            } else {
              this.ruleForm = {
                name: '',
                username: '',
                sex: '1',
                phone: '',
                isNumber: ''
              }
            }
          } else {
            this.$message.error(res.data.msg)
          }
        })
      } else { // 修改操作
        updateEmployee(this.ruleForm).then(res => {
          if (res.data.code === 1) {
            this.$message.success('员工修改成功!')
            this.$router.push('/employee')
          } else {
            this.$message.error(res.data.msg)
          }
        })
      }
    }
  })
}
最终效果如下:
套餐管理
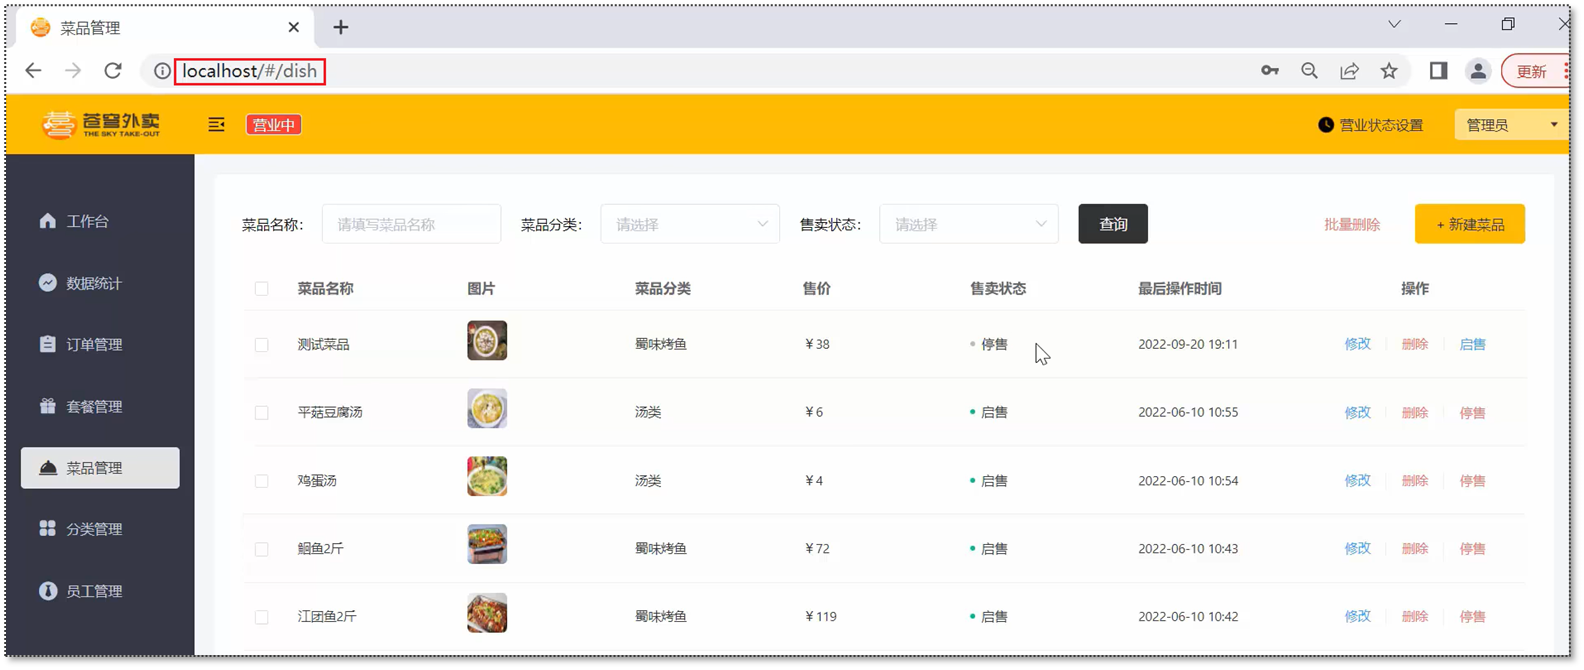
套餐分页查询
需求分析与接口设计
产品原型
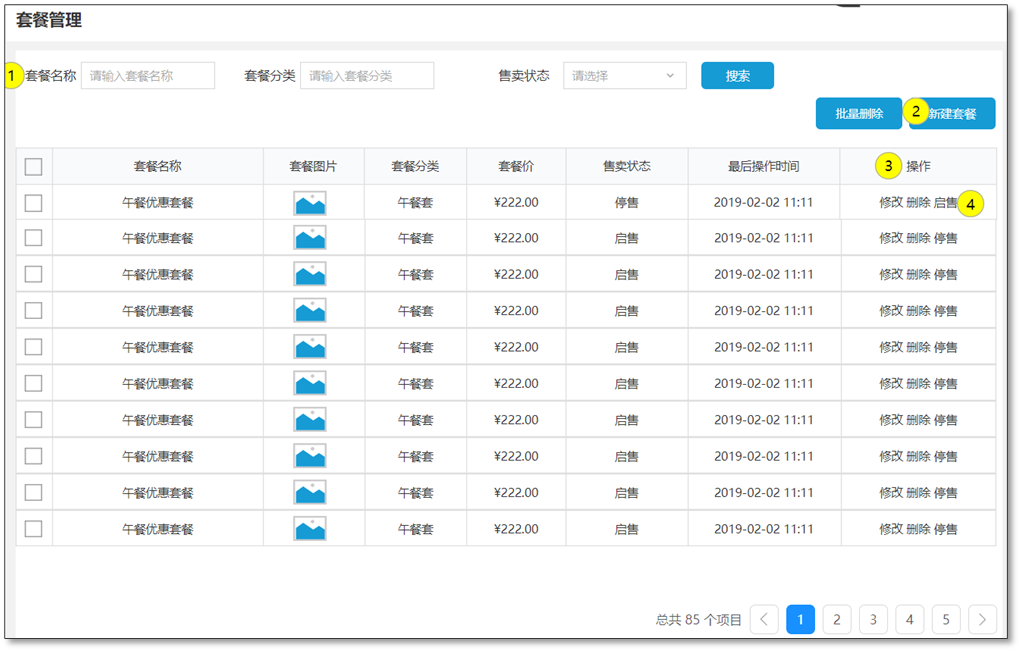
业务规则:
- 根据页码展示套餐信息
- 每页展示10条数据
- 分页查询时可以根据需要,输入套餐名称、套餐分类、售卖状态 进行查询
接口设计
套餐分页查询接口:
分类查询接口:
代码实现
通过 router.ts 找到套餐管理页面
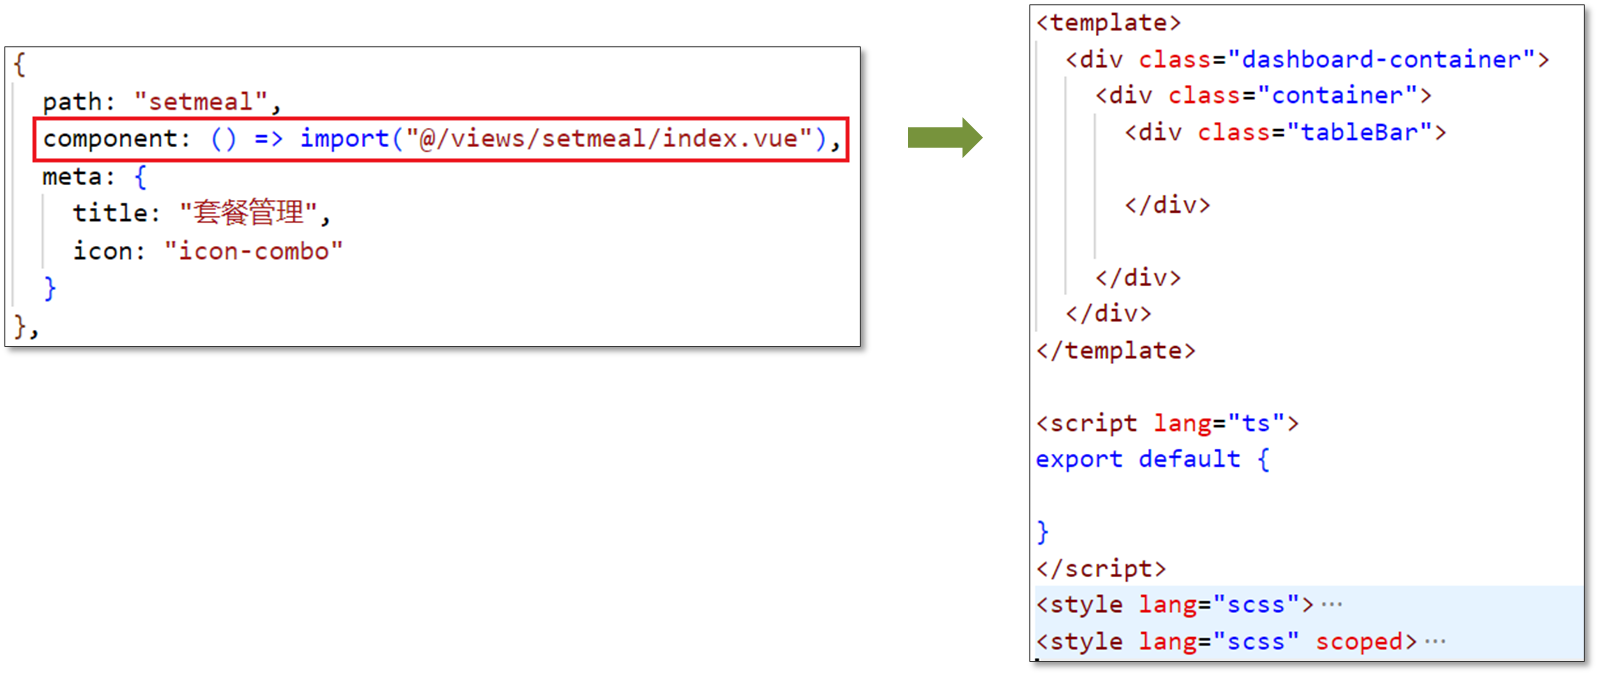
制作页面头部
<template>
<div class="dashboard-container">
<div class="container">
<div class="tableBar">
<label style="margin-right: 10px;">套餐名称:</label>
<el-input style="width: 14%;" clearable />
<label style="margin-right: 10px; margin-left: 20px">套餐分类:</label>
<el-select v-model="categoryId" placeholder="请选择">
<el-option v-for="item in options"
:key="item.id"
:label="item.name"
:value="item.id"
/>
</el-select>
<label style="margin-right: 10px; margin-left: 20px;">售卖状态:</label>
<el-select v-model="status" style="width: 14%" placeholder="请选择" clearable>
<el-option v-for="item in statusArr"
:key="item.value"
:label="item.label"
:value="item.value"
/>
</el-select>
<el-button type="primary" style="margin-left: 20px;">
查询
</el-button>
<div style="float: right">
<el-button type="danger">
批量删除
</el-button>
<el-button type="info">
+ 新建套餐
</el-button>
</div>
</div>
</div>
</div>
</template>
<script lang="ts">
import {getCategoryByType} from '@/api/category';
export default {
data () {
return {
options: [],
status: '', // 售卖状态
categoryId: '', // 分类id
statusArr: [ // 售卖状态
{
value: '1',
label: '启售'
},
{
value: '0',
label: '停售'
}
]
}
},
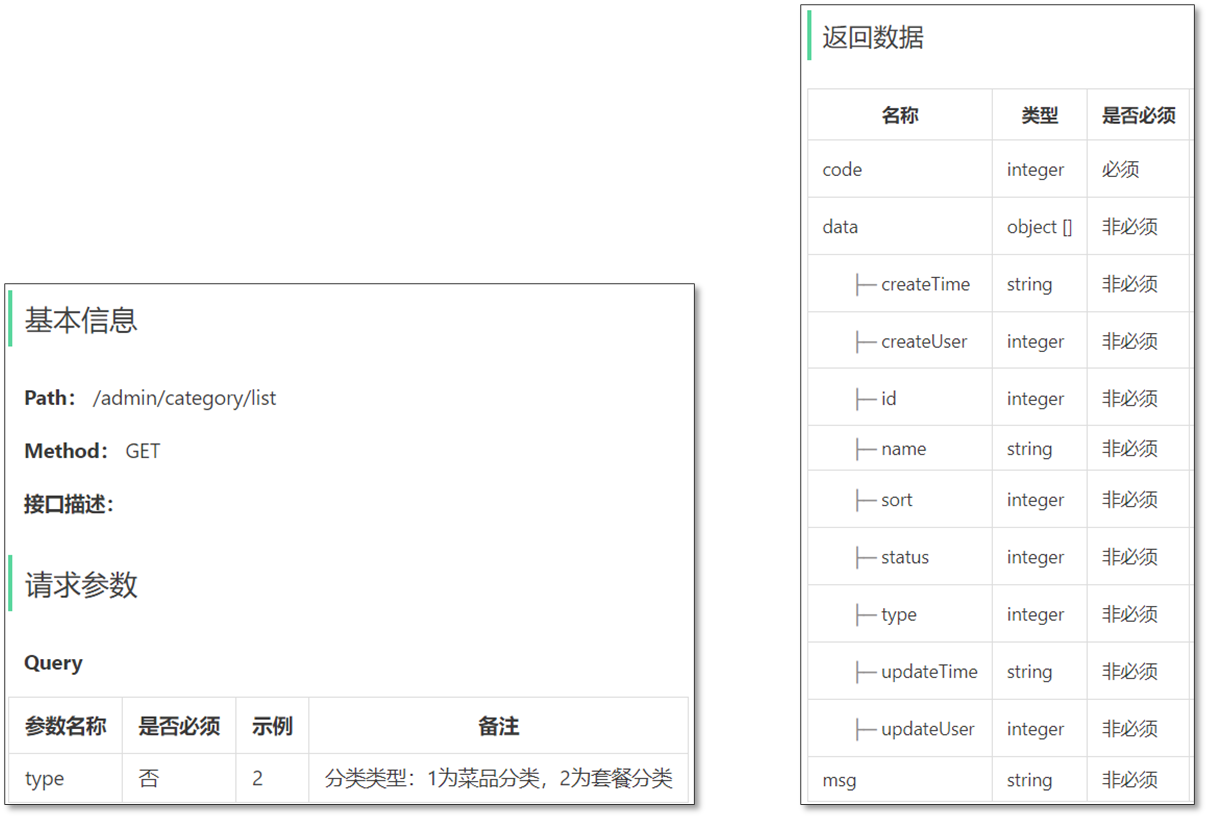
created() {
getCategoryByType({type: 2}).then(res => {
if (res.data.code === 1) this.options = res.data.data
})
}
}
</script>
查询操作绑定事件
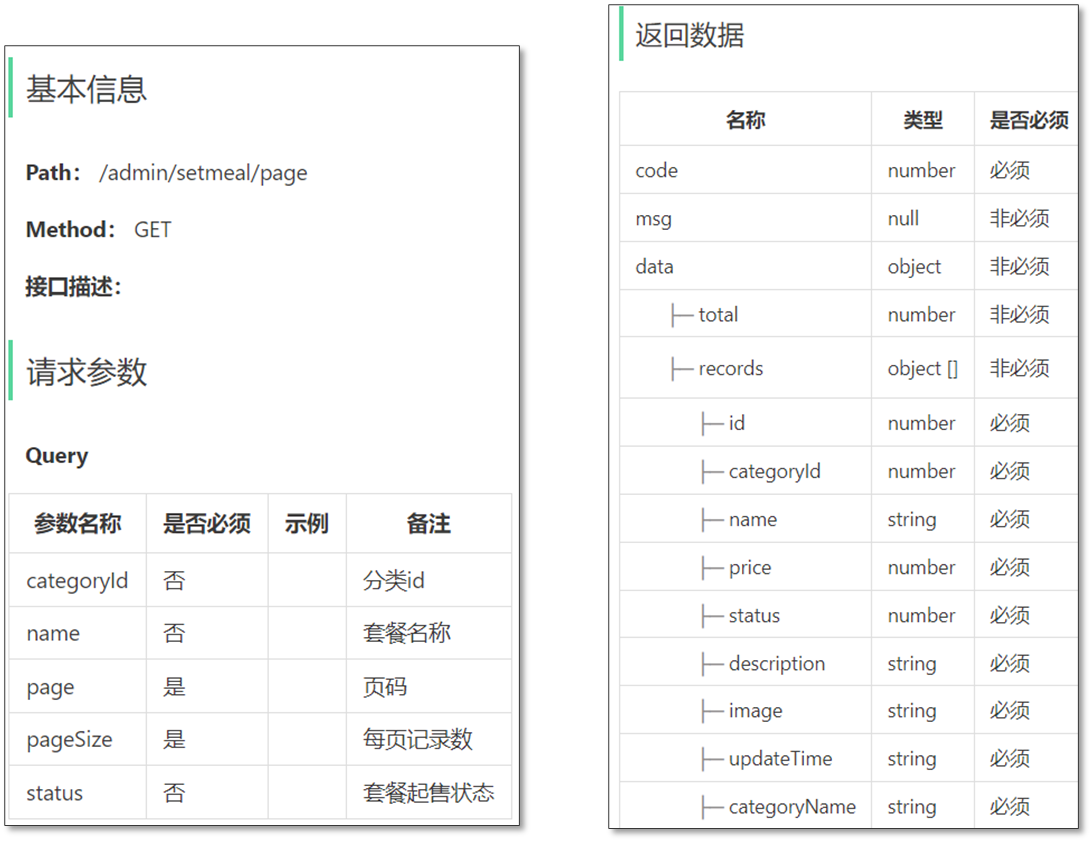
在src/api/setMeal.ts 中定义方法,发送Ajax请求获取分页数据
//套餐分页查询
export const getSetmealPage = (params: any) => {
    return request({
        url: '/setmeal/page',
        method: 'GET',
        params: params
    })
}
在套餐管理组件中导入 setMeal.ts 中定义的方法,并在data() 方法中定义分页相关的模型数据
data () {
  return {
    page: 1,
    pageSize: 10,
    name: '', // 套餐名称
    total: 0,
    records: [],
    options: [],
    status: '', // 售卖状态
    categoryId: '', // 分类id
    statusArr: [ // 售卖状态
      {
        value: '1',
        label: '启售'
      },
      {
        value: '0',
        label: '停售'
      }
    ]
  }
},
定义 pageQuery 方法,并绑定事件
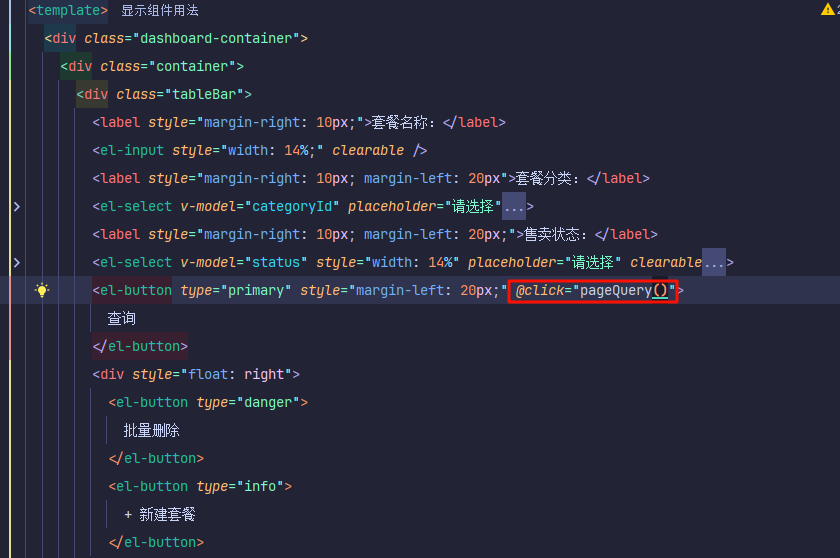
pageQuery() {
  // 封装分页查询参数
  const params = {
    page: this.page,
    pageSize: this.pageSize,
    name: this.name,
    status: this.status,
    categoryId: this.categoryId
  }
  // 调用分页查询接口
  getSetmealPage(params)
    .then(res => {
      if (res.data.code === 1) {
        this.total = res.data.data.total
        this.records = res.data.data.records
      }
    })
}
并且让页面加载后就查询分页数据:
使用 ElementUI 提供的表格组件展示分页数据
<el-table :data="records" stripe class="tableBox">
  <el-table-column type="selection" width="25" />
  <el-table-column prop="name" label="套餐名称" />
  <el-table-column label="图片">
    <template v-slot="scope">
      <el-image style="width: 80px;height: 40px;border: none" :src="scope.row.image" />
    </template>
  </el-table-column>
  <el-table-column prop="categoryName" label="套餐分类" />
  <el-table-column prop="price" label="套餐价" />
  <el-table-column label="售卖状态">
    <template v-slot="scope">
      <div class="tableColumn-status" :class="{ 'stop-use' : scope.row.status === 0 }">
        {{ scope.row.status === 0 ? '停售' : '启售' }}
      </div>
    </template>
  </el-table-column>
  <el-table-column prop="updateTime" label="最后操作时间" />
  <el-table-column label="操作" align="center" width="250px">
    <template v-slot="scope">
      <el-button type="text" size="small">
        修改
      </el-button>
      <el-button type="text" size="small">
        {{ scope.row.status === 1 ? '停售' : '启售' }}
      </el-button>
      <el-button type="text" size="small">
        删除
      </el-button>
    </template>
  </el-table-column>
</el-table>
使用 ElementUI 提供的分页条组件,并绑定事件处理函数
<el-pagination
  class="pageList"
  :page-size="pageSize"
  :page-sizes="[10, 20, 30, 40, 50]"
  layout="total, sizes, prev, pager, next, jumper"
  :total="total"
  @size-change="handleSizeChange"
  @current-change="handleCurrentChange"
/>
handleSizeChange(pageSize) {
  this.pageSize = pageSize
  this.pageQuery()
},
handleCurrentChange(page) {
  this.page = page
  this.pageQuery()
}
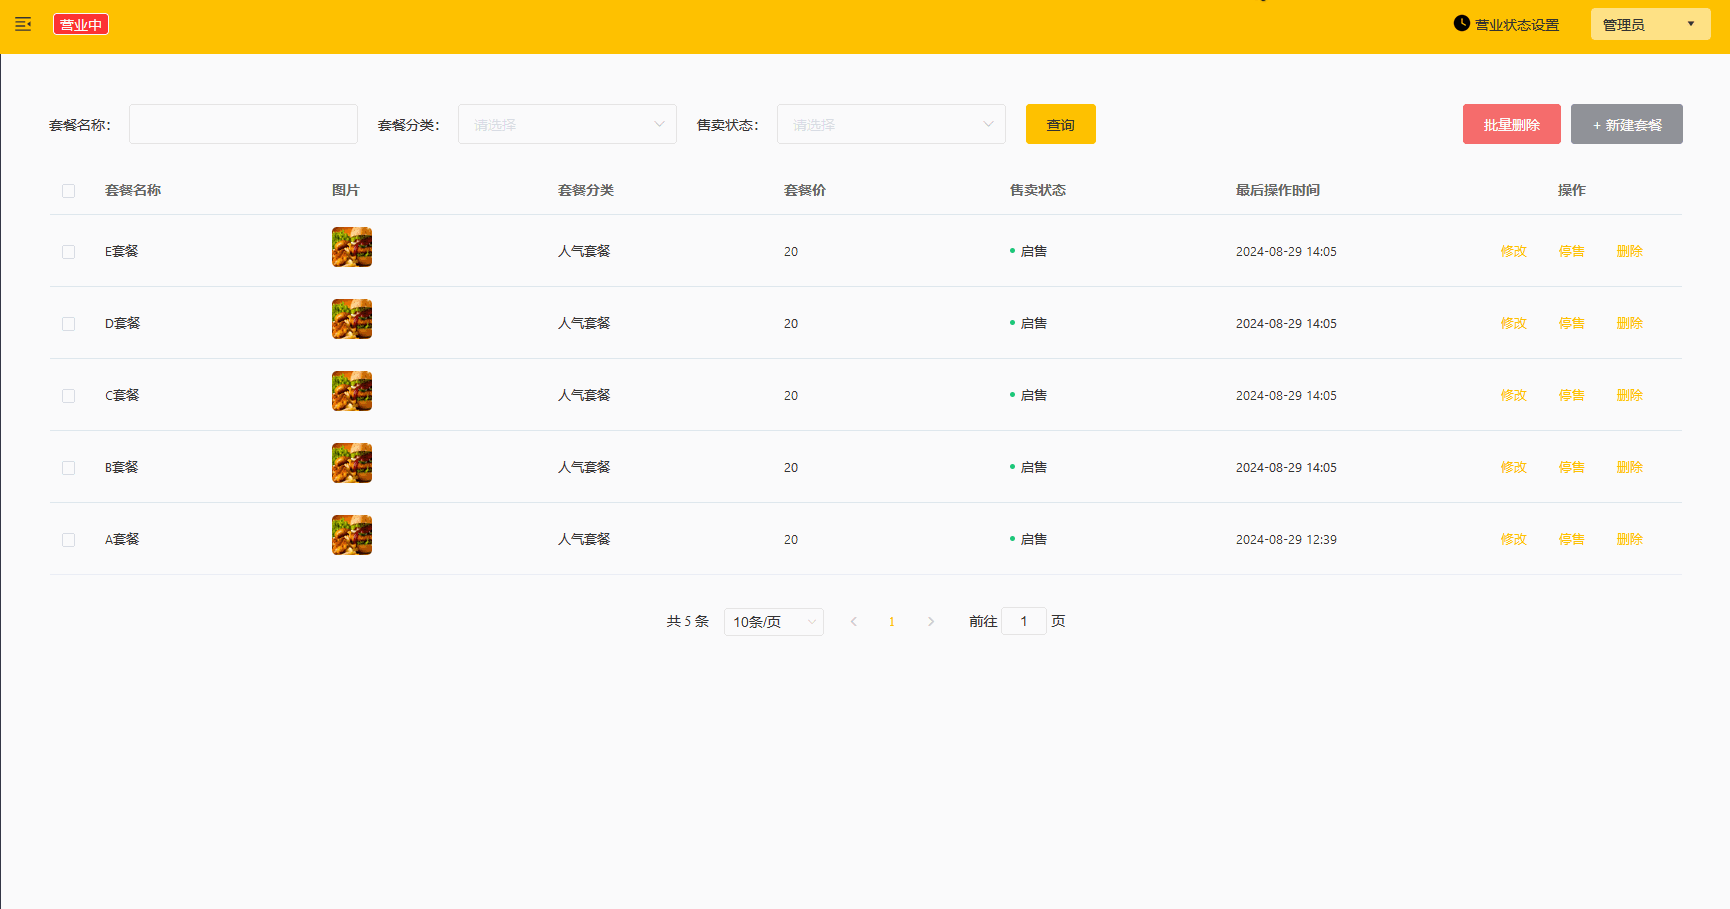
最终效果:

启售停售套餐
需求分析和接口设计
产品原型

接口设计
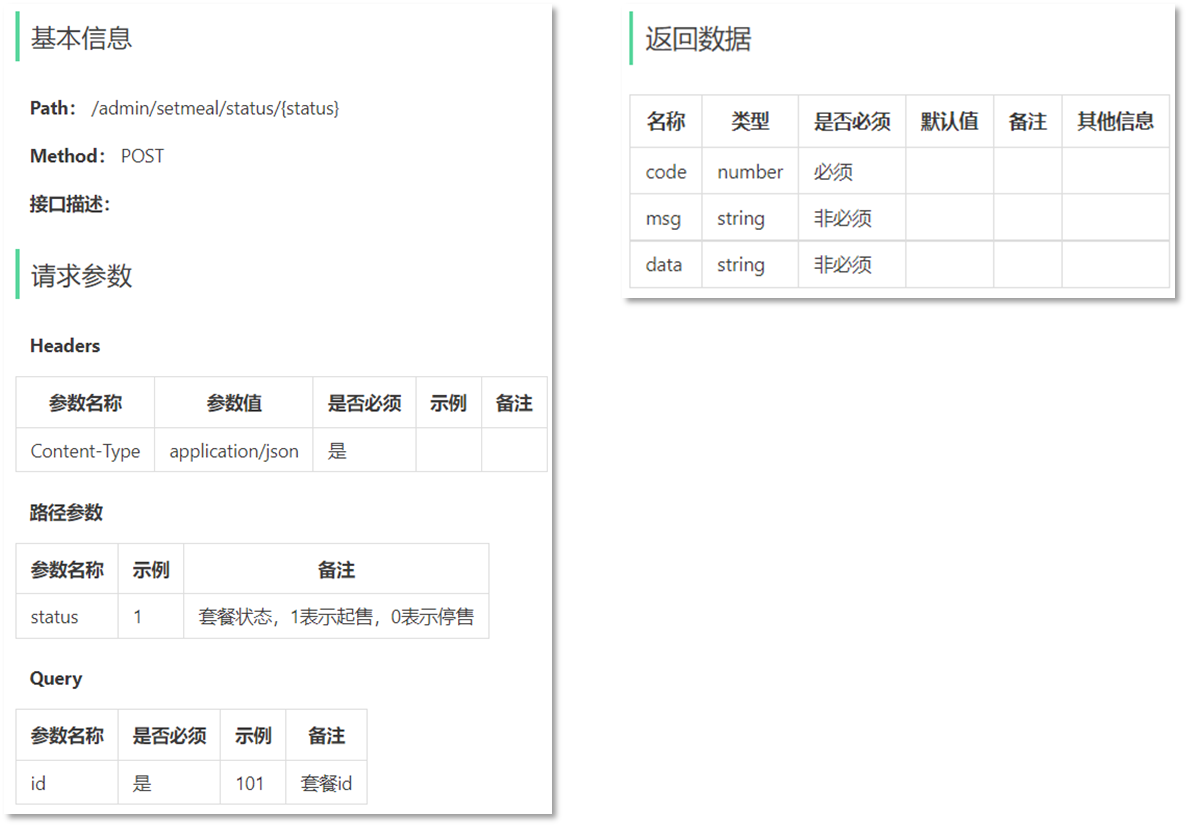
代码实现
在 setMeal.ts 中封装套餐起售停售方法,发送Ajax请求

为启售、停售按钮绑定单击事件

处理函数
handleStartOrStop(row) {
  this.$confirm('确认调整该套餐的售卖状态?', '提示', {
    confirmButtonText: '确定',
    cancelButtonText: '取消',
    type: 'warning'
  }).then(() => {
    enableOrDisableSetmeal({ id: row.id, status: !row.status ? 1 : 0 }).then(res => {
      if (res.status === 200) {
        this.$message.success('套餐状态更改成功!')
        this.pageQuery()
      }
    }).catch( err => {
      this.$message.error('请求出错了:' + err.message)
    })
  })
}
最终效果如下:

删除套餐
需求分析和接口设计
产品原型
接口设计
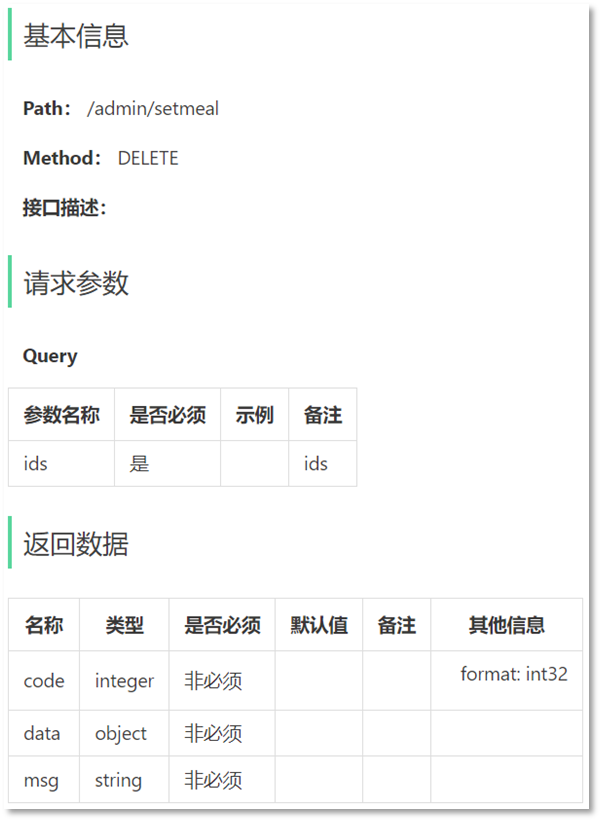
代码实现
在 setMeal.ts 中封装删除套餐方法,发送Ajax请求
//删除套餐
export const deleteSetmeal = (ids: string) => { //1,2,3
    return request({
        url: '/setmeal',
        method: 'DELETE',
        params: {ids: ids}
    })
}
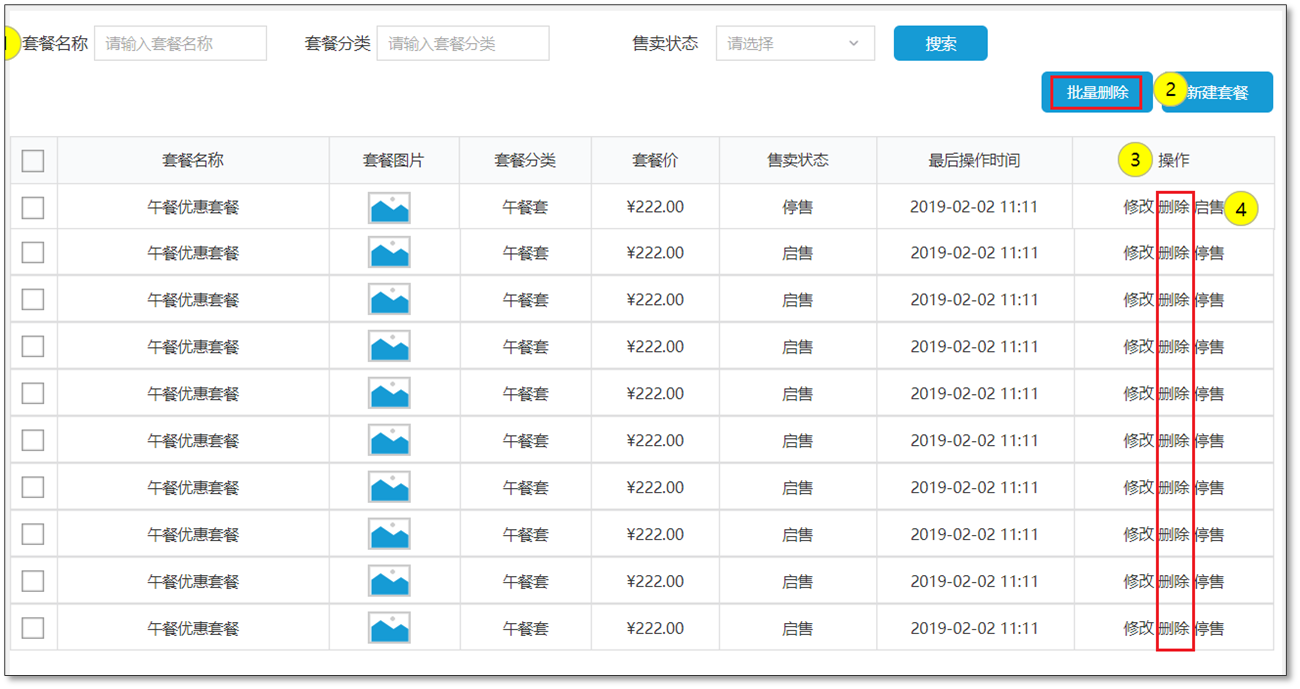
同时选中多个套餐
- 为表格添加 selection-change 事件和对应的处理函数

data () {
  return {
    multipleSelection: [], // 当前被选中的行
    page: 1,
    pageSize: 10,
    name: '', // 套餐名称
    total: 0,
    records: [],
    options: [],
    status: '', // 售卖状态
    categoryId: '', // 分类id
    statusArr: [ // 售卖状态
      {
        value: '1',
        label: '启售'
      },
      {
        value: '0',
        label: '停售'
      }
    ]
  }
},
methods: {
	handleSelectionChange(val) {
	  this.multipleSelection = val
	}
}
为【批量删除】 和【删除】按钮绑定单击事件
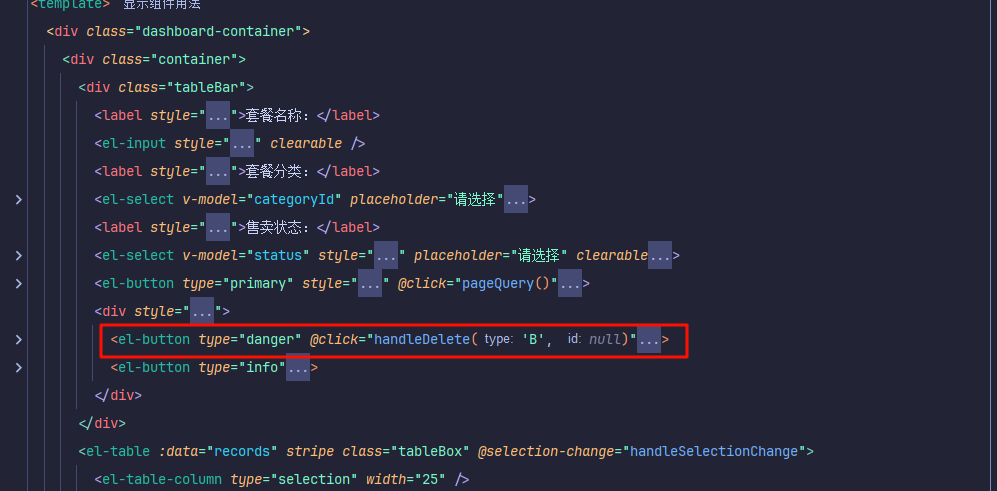
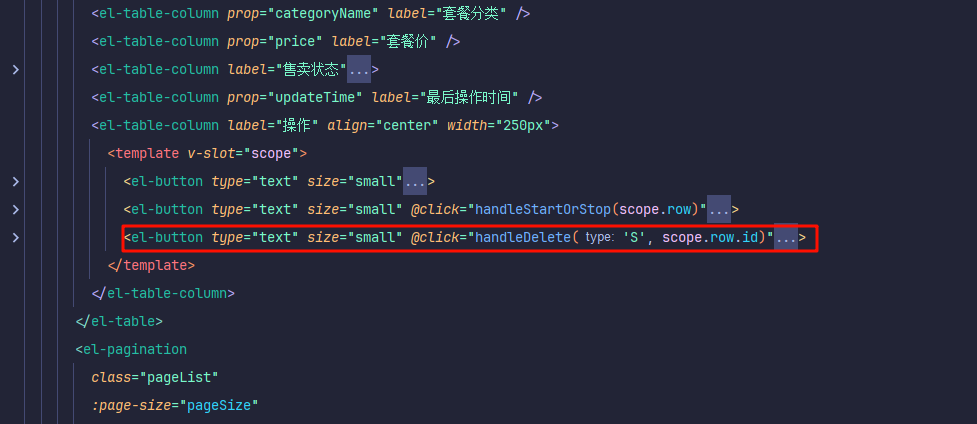
// 删除套餐
handleDelete(type: string, id: string) {
  if (type === 'B' && this.multipleSelection.length === 0) {
    this.$message('请选择需要删除的套餐!')
    return
  }
  this.$confirm(`确定删除${type === 'B' ? '这些' : '该'}套餐?`, '确定删除', {
    confirmButtonText: '删除',
    cancelButtonText: '取消',
    type: 'warning'
  }).then(() => {
    let param = ''
    // 判断是单个删除还是批量删除
    if (type === 'S') {
      // 单个删除
      param = id
    } else {
      // 批量删除
      const arr = []
      this.multipleSelection.forEach(element => {
        // 将套餐id放入数组
        arr.push(element.id)
      })
      param = arr.join(',') // 将数组中的id拼接到一起,中间用逗号分隔
    }
    deleteSetmeal(param)
      .then(res => {
        if (res.data.code === 1) {
          this.$message.success('删除成功!')
          this.pageQuery()
        } else {
          this.$message.error(res.data.msg)
        }
      })
  })
}
最终效果如下:
新增套餐
本章初始工程已经写完了所有代码,直接给添加套餐按钮添加路由跳转即可:
<el-button type="info" @click="$router.push('/setmeal/add')">
  + 新建套餐
</el-button>
添加页面代码:
<template>
<div class="addBrand-container">
<div class="container">
<el-form ref="ruleForm"
:model="ruleForm"
:rules="rules"
:inline="true"
label-width="180px"
class="demo-ruleForm"
>
<div>
<el-form-item label="套餐名称:"
prop="name"
>
<el-input v-model="ruleForm.name"
placeholder="请填写套餐名称"
maxlength="14"
/>
</el-form-item>
<el-form-item label="套餐分类:"
prop="idType"
>
<el-select v-model="ruleForm.idType"
placeholder="请选择套餐分类"
@change="$forceUpdate()"
>
<el-option v-for="(item, index) in setMealList"
:key="index"
:label="item.name"
:value="item.id"
/>
</el-select>
</el-form-item>
</div>
<div>
<el-form-item label="套餐价格:"
prop="price"
>
<el-input v-model="ruleForm.price"
placeholder="请设置套餐价格"
/>
</el-form-item>
</div>
<div>
<el-form-item label="套餐菜品:"
required
>
<el-form-item>
<div class="addDish">
<span v-if="dishTable.length == 0"
class="addBut"
@click="openAddDish('new')"
>
+ 添加菜品</span>
<div v-if="dishTable.length != 0"
class="content"
>
<div class="addBut"
style="margin-bottom: 20px"
@click="openAddDish('change')"
>
+ 添加菜品
</div>
<div class="table">
<el-table :data="dishTable"
style="width: 100%"
>
<el-table-column prop="name"
label="名称"
width="180"
align="center"
/>
<el-table-column prop="price"
label="原价"
width="180"
align="center"
>
<template slot-scope="scope">
{{ (Number(scope.row.price).toFixed(2) * 100) / 100 }}
</template>
</el-table-column>
<el-table-column prop="address"
label="份数"
align="center"
>
<template slot-scope="scope">
<el-input-number v-model="scope.row.copies"
size="small"
:min="1"
:max="99"
label="描述文字"
/>
</template>
</el-table-column>
<el-table-column prop="address"
label="操作"
width="180px;"
align="center"
>
<template slot-scope="scope">
<el-button type="text"
size="small"
class="delBut non"
@click="delDishHandle(scope.$index)"
>
删除
</el-button>
</template>
</el-table-column>
</el-table>
</div>
</div>
</div>
</el-form-item>
</el-form-item>
</div>
<div>
<el-form-item label="套餐图片:"
required
prop="image"
>
<image-upload :prop-image-url="imageUrl"
@imageChange="imageChange"
>
图片大小不超过2M<br>仅能上传 PNG JPEG JPG类型图片<br>建议上传200*200或300*300尺寸的图片
</image-upload>
</el-form-item>
</div>
<div class="address">
<el-form-item label="套餐描述:">
<el-input v-model="ruleForm.description"
type="textarea"
:rows="3"
maxlength="200"
placeholder="套餐描述,最长200字"
/>
</el-form-item>
</div>
<div class="subBox address">
<el-form-item>
<el-button @click="() => $router.back()">
取消
</el-button>
<el-button type="primary"
:class="{ continue: actionType === 'add' }"
@click="submitForm('ruleForm', false)"
>
保存
</el-button>
<el-button v-if="actionType == 'add'"
type="primary"
@click="submitForm('ruleForm', true)"
>
保存并继续添加
</el-button>
</el-form-item>
</div>
</el-form>
</div>
<el-dialog v-if="dialogVisible"
title="添加菜品"
class="addDishList"
:visible.sync="dialogVisible"
width="60%"
:before-close="handleClose"
>
<AddDish v-if="dialogVisible"
ref="adddish"
:check-list="checkList"
:seach-key="seachKey"
:dish-list="dishList"
@checkList="getCheckList"
/>
<span slot="footer"
class="dialog-footer"
>
<el-button @click="handleClose">取 消</el-button>
<el-button type="primary"
@click="addTableList"
>添 加</el-button>
</span>
</el-dialog>
</div>
</template>
<script lang="ts">
import { Component, Vue } from 'vue-property-decorator'
import HeadLable from '@/components/HeadLable/index.vue'
import ImageUpload from '@/components/ImgUpload/index.vue'
import AddDish from './components/AddDish.vue'
import { querySetmealById, addSetmeal, editSetmeal } from '@/api/setMeal'
import { getCategoryList } from '@/api/dish'
import { baseUrl } from '@/config.json'
@Component({
name: 'addShop',
components: {
HeadLable,
AddDish,
ImageUpload
}
})
export default class extends Vue {
private value: string = ''
private setMealList: [] = []
private seachKey: string = ''
private dishList: [] = []
private imageUrl: string = ''
private actionType: string = ''
private dishTable: [] = []
private dialogVisible: boolean = false
private checkList: any[] = []
private ruleForm = {
name: '',
categoryId: '',
price: '',
code: '',
image: '',
description: '',
dishList: [],
status: true,
idType: ''
}
get rules() {
return {
name: {
required: true,
validator: (rule: any, value: string, callback: Function) => {
if (!value) {
callback(new Error('请输入套餐名称'))
} else {
const reg = /^([A-Za-z0-9\u4e00-\u9fa5]){2,20}$/
if (!reg.test(value)) {
callback(new Error('套餐名称输入不符,请输入2-20个字符'))
} else {
callback()
}
}
},
trigger: 'blur'
},
idType: {
required: true,
message: '请选择套餐分类',
trigger: 'change'
},
image: {
required: true,
message: '菜品图片不能为空'
},
price: {
required: true,
// 'message': '请输入套餐价格',
validator: (rules: any, value: string, callback: Function) => {
const reg = /^([1-9]\d{0,5}|0)(\.\d{1,2})?$/
if (!reg.test(value) || Number(value) <= 0) {
callback(
new Error(
'套餐价格格式有误,请输入大于零且最多保留两位小数的金额'
)
)
} else {
callback()
}
},
trigger: 'blur'
},
code: { required: true, message: '请输入商品码', trigger: 'blur' }
}
}
created() {
this.getDishTypeList()
this.actionType = this.$route.query.id ? 'edit' : 'add'
if (this.actionType == 'edit') {
this.init()
}
}
private async init() {
querySetmealById(this.$route.query.id).then(res => {
if (res && res.data && res.data.code === 1) {
this.ruleForm = res.data.data
this.ruleForm.status = res.data.data.status == '1'
;(this.ruleForm as any).price = res.data.data.price
// this.imageUrl = `http://172.17.2.120:8080/common/download?name=${res.data.data.image}`
this.imageUrl = res.data.data.image
this.checkList = res.data.data.setmealDishes
this.dishTable = res.data.data.setmealDishes.reverse()
this.ruleForm.idType = res.data.data.categoryId
} else {
this.$message.error(res.data.msg)
}
})
}
private seachHandle() {
this.seachKey = this.value
}
// 获取套餐分类
private getDishTypeList() {
getCategoryList({ type: 2, page: 1, pageSize: 1000 }).then(res => {
if (res && res.data && res.data.code === 1) {
this.setMealList = res.data.data.map((obj: any) => ({
...obj,
idType: obj.id
}))
} else {
this.$message.error(res.data.msg)
}
})
}
// 通过套餐ID获取菜品列表分类
// private getDishList (id:number) {
// getDishListType({id}).then(res => {
// if (res.data.code == 200) {
// const { data } = res.data
// this.dishList = data
// } else {
// this.$message.error(res.data.desc)
// }
// })
// }
// 删除套餐菜品
delDishHandle(index: any) {
this.dishTable.splice(index, 1)
this.checkList = this.dishTable
// this.checkList.splice(index, 1)
}
// 获取添加菜品数据 - 确定加菜倒序展示
private getCheckList(value: any) {
this.checkList = [...value].reverse()
}
// 添加菜品
openAddDish(st: string) {
this.seachKey = ''
this.dialogVisible = true
}
// 取消添加菜品
handleClose(done: any) {
// this.$refs.adddish.close()
this.dialogVisible = false
this.checkList = JSON.parse(JSON.stringify(this.dishTable))
// this.dialogVisible = false
}
// 保存添加菜品列表
public addTableList() {
this.dishTable = JSON.parse(JSON.stringify(this.checkList))
this.dishTable.forEach((n: any) => {
n.copies = 1
})
this.dialogVisible = false
}
public submitForm(formName: any, st: any) {
(this.$refs[formName] as any).validate((valid: any) => {
if (valid) {
if (this.dishTable.length === 0) {
return this.$message.error('套餐下菜品不能为空')
}
if (!this.ruleForm.image) return this.$message.error('套餐图片不能为空')
let prams = { ...this.ruleForm } as any
prams.setmealDishes = this.dishTable.map((obj: any) => ({
copies: obj.copies,
dishId: obj.dishId,
name: obj.name,
price: obj.price
}))
;(prams as any).status =
this.actionType === 'add' ? 0 : this.ruleForm.status ? 1 : 0
prams.categoryId = this.ruleForm.idType
// delete prams.dishList
if (this.actionType == 'add') {
delete prams.id
addSetmeal(prams)
.then(res => {
if (res && res.data && res.data.code === 1) {
this.$message.success('套餐添加成功!')
if (!st) {
this.$router.push({ path: '/setmeal' })
} else {
(this as any).$refs.ruleForm.resetFields()
this.dishList = []
this.dishTable = []
this.ruleForm = {
name: '',
categoryId: '',
price: '',
code: '',
image: '',
description: '',
dishList: [],
status: true,
id: '',
idType: ''
} as any
this.imageUrl = ''
}
} else {
this.$message.error(res.data.msg)
}
})
.catch(err => {
this.$message.error('请求出错了:' + err.message)
})
} else {
delete prams.updateTime
editSetmeal(prams)
.then(res => {
if (res.data.code === 1) {
this.$message.success('套餐修改成功!')
this.$router.push({ path: '/setmeal' })
} else {
// this.$message.error(res.data.desc || res.data.message)
}
})
.catch(err => {
this.$message.error('请求出错了:' + err.message)
})
}
} else {
// console.log('error submit!!')
return false
}
})
}
imageChange(value: any) {
this.ruleForm.image = value
}
}
</script>
<style>
.avatar-uploader .el-icon-plus:after {
position: absolute;
display: inline-block;
content: ' ' !important;
left: calc(50% - 20px);
top: calc(50% - 40px);
width: 40px;
height: 40px;
background: url('./../../assets/icons/icon_upload@2x.png') center center
no-repeat;
background-size: 20px;
}
</style>
<style lang="scss">
// .el-form-item__error {
// top: 90%;
// }
.addBrand-container {
.avatar-uploader .el-upload {
border: 1px dashed #d9d9d9;
border-radius: 6px;
cursor: pointer;
position: relative;
overflow: hidden;
}
.avatar-uploader .el-upload:hover {
border-color: #ffc200;
}
.avatar-uploader-icon {
font-size: 28px;
color: #8c939d;
width: 200px;
height: 160px;
line-height: 160px;
text-align: center;
}
.avatar {
width: 200px;
height: 160px;
display: block;
}
// .el-form--inline .el-form-item__content {
// width: 293px;
// }
.el-input {
width: 293px;
}
.address {
.el-form-item__content {
width: 777px !important;
}
}
.el-input__prefix {
top: 2px;
}
.addDish {
.el-input {
width: 130px;
}
.el-input-number__increase {
border-left: solid 1px #fbe396;
background: #fffbf0;
}
.el-input-number__decrease {
border-right: solid 1px #fbe396;
background: #fffbf0;
}
input {
border: 1px solid #fbe396;
}
.table {
border: solid 1px #ebeef5;
border-radius: 3px;
th {
padding: 5px 0;
}
td {
padding: 7px 0;
}
}
}
.addDishList {
.seachDish {
position: absolute;
top: 12px;
right: 20px;
}
.el-dialog__footer {
padding-top: 27px;
}
.el-dialog__body {
padding: 0;
border-bottom: solid 1px #efefef;
}
.seachDish {
.el-input__inner {
height: 40px;
line-height: 40px;
}
}
}
}
</style>
<style lang="scss" scoped>
.addBrand {
&-container {
margin: 30px;
.container {
position: relative;
z-index: 1;
background: #fff;
padding: 30px;
border-radius: 4px;
min-height: 500px;
.subBox {
padding-top: 30px;
text-align: center;
border-top: solid 1px $gray-5;
}
.el-input {
width: 350px;
}
.addDish {
width: 777px;
.addBut {
background: #ffc200;
display: inline-block;
padding: 0px 20px;
border-radius: 3px;
line-height: 40px;
cursor: pointer;
border-radius: 4px;
color: #333333;
font-weight: 500;
}
.content {
background: #fafafb;
padding: 20px;
border: solid 1px #d8dde3;
border-radius: 3px;
}
}
}
}
}
</style>


